An event refers to specific circumstances in your environment that would cause a change in normal behavior. For example an event could be changes made to firewall policies or a failed login attempt by a blacklisted IP address. Graylog helps you manage events by allowing you to define the specific parameters of an event and alerts you when your log data matches these parameters. In this article, we review how to create and manage event definitions, including how to attach an alert to the event.
There are two main ways to create a new event definition:
Create an Event Definition Through the Wizard
To create an event definition through the wizard in the Graylog interface:
-
Navigate to Alerts.
-
Click the Event Definitions tab.
-
Select Create event definition in the upper right corner.
The first screen in the wizard presents fields where you set the event title, description, and priority. Optionally, you can add event procedures. Create new procedures, or add pre-defined procedures from your library with specific, actionable instructions to resolve an identified issue. See Event Procedures for complete information.
Apply Remediation Steps
You can specify remediation steps (represented as a text value) within event definitions, sigma rules, and anomaly detectors. This functionality allows you to outline actionable measures for security analysts to follow when an alert is triggered. When specified, these remediation steps are prominently displayed upon the triggering of security events, guiding you on the appropriate next steps to take.
For more information, see Remediation Steps.
Define a Priority
The event priority is a user-defined classification that indicates the relative importance of an event. Events are assigned a priority level from 1 to 5: Informational (1), Low (2), Medium (3), High (4), and Critical (5). This classification helps prioritize and triage events during security investigations.
The event priority is displayed as a thermometer icon in the event overview and is included in generated alerts.
For example, a single failed login within 10 minutes might be classified as a low-priority event. Two or three failed login attempts in the same timeframe could be considered medium priority. More than 15 failed login attempts within 10 minutes may be classified as high or critical, as this pattern can indicate a potential brute-force attack.
Set Event Type
Additionally in the wizard you can define the type of event. Select the event type from the Condition Type drop-down menu:
-
Filter & Aggregation: Define events based on search and filtering of log data.
-
Event Correlation: Define events based on the occurrence of multiple other defined events in a sequence. See Correlation Engine for details.
-
Anomaly Events: Detect anomalies using built-in algorithms. See Detection Types for details.
-
Asset Events: Define events based on asset events exceeding defined risk score thresholds. See Asset Events for details.
-
License Usage Monitoring: Define events for license usage based on either absolute thresholds or percentage of your billing period limit. See License Usage Monitoring Events for details.
After you make your selection, additional fields appear on this page to define the specific event type.
The remainder of this article focuses on Filter & Aggregation events.
Hint: Sigma rules events are displayed on the Event Definitions page, but you define sigma events on the Sigma Rules page in Graylog Security. Graylog Security is a part of the Graylog centralized log management platform and requires a separate license. Contact the Graylog Sales team for more information about this product.
Define Event Criteria
By combining a search query and an aggregation, you can specifically describe the criteria that would constitute a Filter & Aggregation event. In the Filter section, set your search query and other details:
-
Define a search query that your messages should match. The query should use the same syntax as any search from the Search page.
-
Apply a search filter to modify the query results. See below for information about search filters. (optional)
-
Select a stream in which the message can be found.
-
Define the window of time that the filter searches backward to match messages.
The search is executed at the given interval. If the filter matches, an event is created.
An example of using a filter to define an event could be filtering against a search for failed user logins by further refining it to include only certain users. You might also define the window of time to be the last 24 hours or the last 3 days.
If the defined filter matches messages currently on the Graylog server, the messages are displayed in the Filter Preview panel on the right.
Apply a Search Filter
Search filters let you reuse query snippets to refine your search result. If you have properties that you frequently need to either include or exclude from event definitions, you can create them as search filters, which makes them easy to apply across different event definitions.
As an example, you may have a list of IP addresses for your internal users. For some events, you might want to omit this internal activity. You could create a search filter for this and use it in the event definition to eliminate any messages from those addresses. Having this query as a search filter lets you reuse it across different event definitions easily.
For complete information about creating and applying search filters, see Search Filters.
Create an Aggregation
An aggregation is the combination of two or more entities. The new entity processes specific and meaningful results. Aggregations can run a mathematical operation on either a numeric field value or the raw count of messages generated that match the filter. Aggregations can group matches by a selected field before making the comparison.
For instance, if the field username is defined, then it is possible to alert on five successive failed logins by a particular username. In this example, you would create an event definition that triggers if there are five or more consecutive failed login messages that pertain to the targeted user.
Create a Custom Field
You can also create a custom field as part of an event definition in the Fields menu. These fields allow an event generated from this definition to populate data from the original log into the Graylog events index. This prevents you from having to run subsequent searches to get vital information. These fields can also be used to limit the amount of data sent to an alert target, and you can run aggregations that include custom fields.
Hint: The event is recorded to the All Events stream and contains the custom field as well as the result of the aggregation that triggered the event.
These fields can be accessed within an alert and can be used as part of the Enterprise event correlation feature.
Attach an Alert
In the Notifications menu, you can attach an alert to your event definition. See the Alerts article for information on how to set up an alert and the alert types available.
Add Collaboration and Sharing
In the Share menu, select any collaboration and sharing options. The Graylog permissions model requires you to grant access to any intended collaborators on an entity. You can share entities with individuals or teams when you create the entity.
For complete details, see Share a New Entity.
Create an Event Definition Directly From Search Results
You can select any value in your search results to create an event definition. This event definition generates tailored alerts that include only the specific part of the query that you want to be alerted on. To do so:
-
Go to your search results.
-
Click any value in an aggregation widget, log view, or message widget.
-
Select Create event definition from the drop down menu.
-
Pick one of the Strategy by options in the dialog box that appears. You can select any of these options:
-
Exactly this value: Displays parameters related to your current search. You may add or remove any of these.
-
Any in widget: Displays parameters related to the selected value.
-
Custom: Allows you to include any part of the search query.
-
-
Click Show strategy details to select or deselect any parameters you would like to add to the event definition. The parameters you select here populate in your event definition under Filter & Aggregation.
Hint: In addition to the three options displayed above, you might be presented with other options depending on the value you select. For example, if you select an aggregation widget metric value, you are presented with additional Any in row and Any in column options.
-
Click Continue Configuration. You are redirected to the Event Definitions page. Start by giving your event definition a unique title and filling in other details in Event Details. The selections you made in steps 4 and 5 are populated in Filter & Aggregation. You can add search filters, custom fields, alerts, and collaboration in this menu.
-
After reviewing the summary of your new event definition, click Create event definition. A new event definition is created, and you will receive alerts for the given condition.
Manage Defined Events
All defined events are available on the Event Definitions tab of the Alerts page. You can find details about each entity, such as the priority, status, and scheduling. Click the information icon in the Scheduling column to view information about status, last execution, next execution, next time range, and queued notifications.
The Event Definitions page includes the Bulk actions menu, which lets you delete, enable, and disable multiple entities simultaneously. Under More , you can edit, duplicate, and delete individual definitions. This menu is also where you enable or disable events. Use the Manage collections option to add an event to existing collections .
To find specific events in the list, enter keywords in the search field. The list updates to show only matching items. You can also apply a filter. This feature is particularly useful to distinguish between user-defined event definitions and event definitions generated by Illuminate. You can apply a filter, then enter a keyword search to further limit the returned list.
Event Summary Template
The Event Summary Template field allows you to customize how events appear in the Alerts page. When the Event Summary Template is populated, Graylog uses this field to generate event-specific data in the summary Description column.
This enables you to provide more meaningful, context-rich summaries for each event using dynamic values.
The Event Summary Template supports Java Minimal Template Engine (JMTE) syntax, allowing you to insert dynamic variables into the summary.
You can reference fields from the event and its associated data, similar to how templates are used in email notifications.
Example:
Event triggered for user ${event.fields.username} on host ${event.source}
This renders a descriptive summary using values from the event at runtime.
Manage Illuminate Events
Illuminate events are generated by the Illuminate Event Definitions Rollup pack. This collection provides many predefined events that you can run in your environment. When you enable this pack in Illuminate, these events are added to the Event Definitions page automatically. You can choose which of the events to enable.
To enable or disable an Illuminate event, you have two options from the Event Definitions page:
-
In the Status column, click the enabled / disabled icon to toggle the status.
-
From the More menu, select Enable / Disable to toggle the status.
Illuminate event definitions are predefined. However, these events include two customizable settings. Select More > Edit to open the event definition wizard where you can make the following changes:
-
Search filters: On the Filter & Aggregation page, add a search filter. Although Illuminate event definitions are fixed, you can add search filters to include or exclude properties from the results. See Apply a Search Filter above for information.
-
Alerts: On the Notifications page, add or update alerts you want to send if this event is triggered. See the Alerts article for information on how to set up an alert and the alert types available.
The remaining settings in the wizard are read-only for Illuminate events. Click Update event definition on the Summary page to save your changes.
Replay a Search
You can replay the specific search that triggered an event. Select an entity on the Alerts & Events page, then select Replay Search from the Bulk actions dropdown. If you select multiple events, they appear in the left sidebar of the replay page so that you can review each search individually.
You can review the search results and messages to gather important details in investigating the event. Note that the event and the replayed search can be added to investigations for further research.
Schedule an Event
Cron scheduling automates the process of running an event, making it possible to run events periodically at a fixed time, date, or other interval.
With cron scheduling, you can define a more precise window of time that makes sense to monitor. For example, you can schedule your event to alert you on logins that happen at an unusual time, like outside work hours. Or you could choose to run a costly event only during nighttime hours, when CPU usage is low.
Cron scheduling is determined by cron expressions. A cron expression is a string of fields separated by white space. Graylog uses Quartz cron syntax, for example:
<second> <minute> <hour> <day of month> <month> <day of week> <year>
<year> is optional.
For example, let's say you want to run an event every Monday at 8:05 AM. You enter 8 in the hour field, 5 in the minute field, and MON as the day of the week. So the expression is:
0 5 8 ? * MON *
The <day of month> field in this example is not relevant and is therefore represented with a question mark (?). Other fields that are marked with an asterisks can take any value.
There are several special characters used in cron expressions. Here are some of the most common ones:
-
*: An asterisks can be used for fields that can take any value. For example, if you want to run an event that starts at 12 AM, enter:0 0 0 * * * *. The first three zeros mark thesecond,minute, andhourthat the event will run. The asterisks in the remaining fields mean that these fields accept all values. -
?: Denotes that the field value is irrelevant. Mainly used for days of the week. If you want to run an event on any day of the week, you may use an expression such as:* 5 8 * * ? *. -
/: A forward slash is used to specify ranges. For example,M/Fdenotes Monday through Friday
You can look into resources such as the Cron Trigger Tutorial for more information on special characters and creating cron expressions.
Cron Expression Syntax
The following are some common examples of cron expressions:
| Cron Expression | Description |
|---|---|
0 0 2 * * *
|
At 2:00 AM. |
0 0 * * * *
|
Every hour. |
0 0 9 1-7 * *
|
The first 7 days of every month at 9 AM. |
5/10 * * * *
|
Every 10 minutes, starting at 5 minutes past the hour. |
0 1/5 * 7 * * *
|
Every 5 minutes, starting at 1 minute past the hour, on day 7 of the month. |
0 0 7 1 1 ? *
|
Every first day of January, starting at 7 AM. |
Add Cron Scheduling to an Event Definition
To add cron scheduling to an event definition:
-
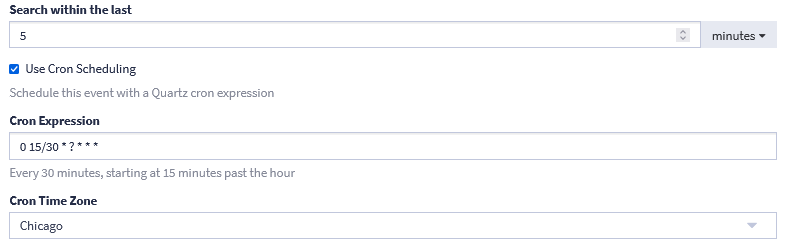
Check the Use cron scheduling box under Filter & Aggregation.
-
Enter the desired cron expression in the Cron expression box.
-
Select a relevant timezone.
Your cron expression will be added to the event definition and can be viewed under Event Details.
See the image below for an example of a cron expression that will schedule an event to run15 minutes past the hour, every thirty minutes:
Filter with Dynamic Lists
Dynamic lists allow you to define a filter where some of the search arguments are parameterized. Every time an event definition is being checked, these parameters are replaced with the result of a dynamic list.
Dynamic lists (such as a lookup tables) can be used to create event definitions:
-
Go to the Alerts page.
-
Navigate to Event Definitions and click Create Event Definition.
-
Enter the required information for Event Details.
-
Select Filter & Aggregation as the Condition Type.
-
Enter your search query using the same syntax as used on the Search page.
-
Click the undeclared parameter that shows up in the Query Parameters box. Enter the required information in the menu that appears and selectSave.
-
Check the Filter Preview section to validate the outcome before you proceed.
-
Click Create event definition on the Summary tab. Now you will receive alerts based on this event definition.
Dynamic Lists Use Case
In this scenario, the user wants to monitor a list of former employees for safety reasons. They want to receive an alert if anyone on the list tries to log in to the company system. Generally, this type of query is usually difficult to maintain because of the immense number of values to compare. Using a lookup table allows them to compare a log value to any value within the list. The lookup table will be updated to include all former employees, including ones that have recently left the company.
The parameter $former_employee$ is backed by a lookup table that returns a current list of former employees. After creating the event definition, the user will be alerted on any login attempts from anybody on the list.
