Graylog's search filters let you refine queries to find specific log messages. Search filters consist of snippets of query syntax that you can run immediately or save for reuse. You can combine search filters with queries or other filters using the AND operator.
This article shows you how to add a search filter to your searches, create new filters, save them for future use, and share them with others.
Search Filters vs. Queries
Search filters are not intended to replace search queries. Instead, use search filters to enhance or focus results from queries to highlight the data you need.
Consider the following uses for search filters:
-
For frequently repeated searches, write query segments that apply in different situations. For example:
source:<some_IP_address>. -
To build modular queries for use in dashboard widgets. When your data structures change, you can update the search filters rather than all dashboards and widgets individually.
-
To make temporary modifications to existing result sets to clarify events or sequences.
-
To exclude assets or sources (such as local or employee IP addresses) that generate extra noise or known false positives.
By default, search filters are joined to an existing query by the AND operator. After you apply a filter, you can use the dropdown menu to exclude the filter instead, which updates the query to AND NOT syntax.
For most search situations, you will likely build searches directly in the query editor rather than with filters. After you run a query, however, you might want to apply a filter for any of the reasons listed above, or for other situations specific to your environment.
Add a Search Filter
There are two ways to apply a filter to a search. You can:
-
Select from your existing filter collection.
-
Create a new filter.
Select from Existing Filters ("My Filters")
-
Select Load filter (the folder icon) in the Filters section to open your list of saved filters.
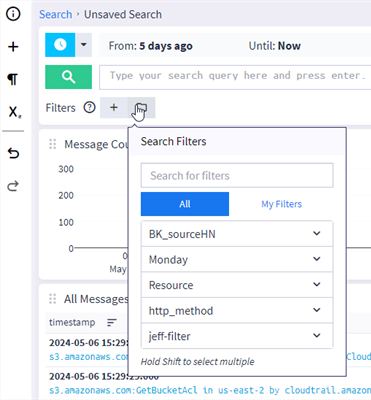
-
Select a search filter from the list.
-
Use the search field to find specific saved filters.
-
Click the arrow on a filter to expand filter details.
-
Hold Shift to select multiple filters.
-
When you select the filter, it appears in the search filters bar and a new search runs automatically.
Create a New Search Filter
To create a search filter from the Search page:
-
Select Create new filter (the + icon) to open the Create Filter dialog box.
-
Enter a search query in the Query field to identify messages you want to match. The query must use the standard query syntax. You receive completion suggestions as you type, just like in the standard search bar.
-
(Optional) Give the search filter a title and a description. Although this step is optional, providing this information makes it easy to identify your saved filters.
-
(Optional) Select the Save to "My Filters" checkbox if you plan to reuse this filter.
Hint: When you create search filters, save them in the "My Filters" collection so they can be reused in subsequent searches. However, any changes you make to saved filters affect all searches where those filters are used. Inline filters, on the other hand, apply only to the current search and can be edited without affecting other searches. -
Select Create filter.
To create a search filter from the My Filters page (Enterprise > My Search Filters):
-
Select Create filter.
-
Enter a search query in the Query field to identify messages you want to match. The query must use the standard query syntax. You receive completion suggestions as you type, just like in the standard search bar.
-
(Optional) Give the search filter a title and a description. Although this step is optional, providing this information makes it easy to identify your saved filters.
-
(Optional) Enter any collaboration and sharing options. For information about collaboration and sharing, see Share Saved Filters.
-
Select Create filter.
Save Searches with Filters
When you save a search with filters, all filter references persist. Graylog remembers which filters are used in the query and automatically applies them when you load the saved search.
When you share a saved search that includes filters, every user who has access to the saved search can interact with its filters. Share a filter with other users (with your own or managed permissions) to let them edit the filter directly.
Share Saved Filters
Search filters can be shared to facilitate team collaboration and to maintain best practices across an organization. For example, a team could share a filter used for troubleshooting with other teams, or an organization might want to share a filter that highlights important log data for all users.
You can also share search filters using collections, which let you include multiple entities in a single share. When you share a collection, all entities in the collection are shared. See Collections for complete details.
Sharing for search filters is managed from the My Filters page (Enterprise > My Search Filters). For complete information about collaboration and sharing, see Manage Sharing for Users and Teams.
Manage Search Filters
After you create or apply search filters, you can manage them directly from the Search page. Graylog lets you temporarily disable a filter, exclude it from results, edit its contents, or save it for reuse, which makes it easier to refine searches without rebuilding the full query each time.
Disable and Enable
To disable or enable filters, click the search filter title check box. A strike-through line indicates that a filter is disabled. Disabled filters can be re-enabled by clearing the check box, which removes the strike-through line.
Exclude and Include from the Result
To exclude the search query of a selected search filter from results, select the search filter to be excluded, expand the dropdown menu associated with the filter, then click Exclude from results. This selection joins the filter to the query with the AND NOT operator instead of AND.
Edit Search Filters
To edit search filters after you apply them:
-
Click the Edit button from the dropdown menu beside the search filter name.
Hint: When you edit a saved search filter (saved in My filters), changes affect all searches where that filter is in use. To change only the current instance, create an inline filter by selecting the Create copy for current search check box. -
Update the query, title, and description as necessary.
-
Click Save to update the filter in My filters.
You can also save already created inline filters to My filters by selecting Save to "My Filters" from the filter's dropdown menu.
Other actions in this menu include:
-
Remove: Removes a filter from the search.
-
Copy query to clipboard: Copies a filter query to your clipboard.
Troubleshooting and Common Issues
The following section outlines troubleshooting steps for common issues to assist you in resolving potential challenges you may encounter.
Issue: Unknown Impact of Editing a Saved Filter
You need to update a saved search filter, but you are not sure which searches in your Graylog environment will be affected by the change.
Solution: Review Filter Details on the My Filters Page
Navigate to the My Filters page at Enterprise > My Search Filters. This page lists all your saved search filters. You can also share, edit, or delete filters from this page.
To see details of an individual filter, select it in the list. The filter detail page shows an overview of all entities that reference the filter, including saved searches, dashboard widgets, event definitions, and sigma rules.
If you attempt to edit or delete a saved search filter, a warning appears if that filter is referenced in a saved search. Changes to the filter affect the search results of the saved search wherever it is referenced.
Further Reading
Explore the following additional resources and recommended readings to expand your knowledge on related topics:
