Create or Add a Sigma Rule
Graylog supports Sigma rules, which identify specific patterns in individual log events, and Sigma Correlation, which connect multiple related events over time to detect more complex or staged behaviors.
This article explains how to incorporate Sigma rules into Graylog, including how to add them manually, import them from both public and private GitHub repositories, or upload them from your local file system. It additionally covers how to configure and deploy Sigma Correlation.
Prerequisites
Before proceeding, ensure that the following prerequisites are met:
-
You must have a Graylog Security license.
-
Graylog 4.3 or higher is required for Sigma rules.
-
Graylog Illuminate is recommended for use with Sigma rules and Sigma Correlation.
Methods to Add Sigma Rules
There are three ways to add Sigma rules to Graylog. You can create them manually, import them from public or private Git repositories, or upload them directly from your local file system.
Add Rules Manually
Graylog provides a YAML editor which allows you to create custom rules directly within the Graylog UI. To add Sigma rules manually:
-
Navigate to Security > Sigma Rules.
-
Click Add Rules, then select Manual Add.
-
Use the YAML editor to create or paste a Sigma rule.
-
Enter the required configuration values in the fields below:
Event Summary Template
Defines a customizable message template for generated Sigma rules events, allowing you to include and format relevant fields from the Sigma rule to provide clear, context-rich summaries for analysts during investigation.
Streams
Set this value to the stream that contains your events (e.g., windows-security-logs or auth-logs) so the rule evaluates the correct log source.
Stream categories
This helps when filtering or organizing at scale.
Notifications
Select a notification to receive email, Slack , or webhook message when an alert is triggered.
Search within
Specify the timeframe used to evaluate events.
Use cron scheduling
Toggle the cron scheduling option to automate the process of running an event, making it possible to run events periodically at a fixed time, date, or other interval.
-
Cron expression: A cron expression is a string of fields separated by white space. Graylog uses Quartz cron syntax, for example:
<second> <minute> <hour> <day of month> <month> <day of week> <year>
Execute every
Rule runs every 5 minutes to check for matches. This value can be adjusted based on need.
Search Filters
Add search filters for more specific matching without changing YAML (e.g., only count failures on domain controllers).
-
-
(Optional) Add event procedures. Create new procedures, or add pre-defined procedures from your library with specific, actionable instructions to resolve an identified issue. See Event Procedures for complete information.
-
(Optional) Enter any collaboration and sharing options. For information about adding collaborators and sharing when creating a Sigma rule, see Share a New Entity. For existing Sigma rules, add or update collaboration settings from the More menu on the Rules page with either the Share or Manage collections option.
-
Click Add rule.
The editor notifies you if required fields are missing (e.g. title) or if a field should be of a certain type (e.g. string) before you attempt to save and exit. If you attempt to use an unsupported search modifier or input an aggregation in the conditions field, you receive a notification that those inputs are not supported.
Review the supported Sigma rule modifiers and operators table for currently supported features, rule specifications, fields required by Graylog that might not be required by the Sigma specifications, and unsupported conditions and modifiers.
When you create Sigma rules, note that an event definition is also created. This is because events need streams and search windows to know over what time window and how frequently to search in order to function properly. These options can be modified in the editor.
Import Rules from Git Repository
To import Sigma rules from a Git repository, you first need to add the source repository to Graylog.
Graylog connects to Git repositories over HTTPS using standard Git authentication. The type of access token you need depends on your Git hosting provider. In all cases, the token only needs read-only access to repository contents. Any Git hosting provider that supports HTTPS clone URLs and token-based authentication (for private repositories) will work, including:
Add Git Repository to Graylog
-
Navigate to Sigma Rules > Sigma Repos.
-
Click the Add Repository button.
-
Fill in the repository details:
-
Name: Enter a unique name for the repository (e.g.
SigmaHQ). -
Branch: Specify a branch or leave blank for the default.
-
Git Repo URI: URL of the repository (e.g.
https://github.com/MyGitRepo/myrepo.git). -
Access Token: Authenticates access to private Git repositories for importing Sigma rules. Leave blank if repository is public.
-
Directories with rules: Specify directories or leave blank to scan the entire repository.
-
-
Click Confirm.
Graylog scans and validates all .yml or .yaml files found in the repository. Only rules that are properly formatted (according to the Sigma specification) and supported are validated and available for import. Any file that is not .yml is skipped. -
Import all Sigma rules from the added repository or select which rules to import. When a repository is added, it appears on the Sigma Rules GIT Repos page.
When you add a repository, Graylog pulls Git data to the disk of the system running the Graylog server to populate the list of available rules. After the operation completes, the files are removed. By default, the files are saved to a temporary directory; however, users with unique system requirements or permission constraints can choose a custom location for storing these files. You can change the directory by adding the Sigma_git_repository_dir property to your Graylog server configuration file with the location of your rule repository, e.g. Sigma_git_repository_dir=/etc/graylog/Sigma_data.
Import Rules from GitHub Repository
Leverage existing, community-maintained rules by connecting to public repositories like the SigmaHQ GitHub project or use personal access tokens to authenticate access to private Git repositories. Graylog can scan the repository, validate supported rule files, and allow you to selectively import or bulk-add them into your environment.
Once the repository is added:
-
Navigate to Security > Sigma Rules.
-
Click Add Rules, then select Import From Git.
-
Select the repository you intend to import Sigma rules from the list of available repositories.
-
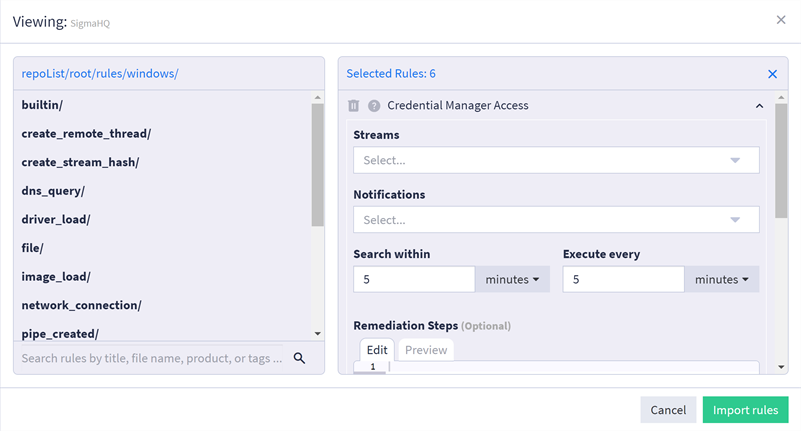
Locate and select the rules to be imported within the sub directories of the selected repository.
-
Select a chosen rule to open the configuration panel, then enter the required configuration values:
Streams
Set this value to the stream that contains your events (e.g., windows-security-logs or auth-logs) so the rule evaluates the correct log source.
Stream categories
This helps when filtering or organizing at scale.
Notifications
Select a notification to receive email, Slack , or webhook message when an alert is triggered.
Search within
Specify the timeframe used to evaluate events.
Use cron scheduling
Toggle the cron scheduling option to automate the process of running an event, making it possible to run events periodically at a fixed time, date, or other interval.
-
Cron expression: A cron expression is a string of fields separated by white space. Graylog uses Quartz cron syntax, for example:
<second> <minute> <hour> <day of month> <month> <day of week> <year>
Execute every
Rule runs every 5 minutes to check for matches. This value can be adjusted based on need.
Search Filters
Add search filters for more specific matching without changing YAML (e.g., only count failures on domain controllers).
-
-
(Optional) Add event procedures. Create new procedures, or add pre-defined procedures from your library with specific, actionable instructions to resolve an identified issue. See Event Procedures for complete information.
-
(Optional) Enter any collaboration and sharing options. For information about adding collaborators and sharing when creating a Sigma rule, see Share a New Entity. For existing Sigma rules, add or update collaboration settings from the More menu on the Rules page with either the Share or Manage collections option.
-
If you are importing multiple rules, complete the previous three steps for each separately, or select Copy these options to all to use the same values for all of them.
-
Click Import rules. The selected rules are imported into Graylog.
You can also import all rules from the repository by navigating to the Sigma Repos tab, clicking the ellipsis to the right of a selected repository, and selecting the Import All option.
Upload from a Local File System
If you already have Sigma rules stored locally or exported from another system, you can upload them from your file system directly into Graylog.
-
Navigate to Security > Sigma Rules.
-
Select Add Rules, then select Upload Rules.
-
Select individual Sigma YAML files or .zip files containing multiple YAML files.
-
Enter the required configuration values in the fields below:
Streams
Set this value to the stream that contains your events (e.g., windows-security-logs or auth-logs) so the rule evaluates the correct log source.
Stream categories
This helps when filtering or organizing at scale.
Notifications
Select a notification to receive email, Slack , or webhook message when an alert is triggered.
Search within
Specify the timeframe used to evaluate events.
Use cron scheduling
Toggle the cron scheduling option to automate the process of running an event, making it possible to run events periodically at a fixed time, date, or other interval.
-
Cron expression: A cron expression is a string of fields separated by white space. Graylog uses Quartz cron syntax, for example:
<second> <minute> <hour> <day of month> <month> <day of week> <year>
Execute every
Rule runs every 5 minutes to check for matches. This value can be adjusted based on need.
Search Filters
Add search filters for more specific matching without changing YAML (e.g., only count failures on domain controllers).
-
-
(Optional) Add Event Procedures. Create new procedures, or add pre-defined procedures from your library with specific, actionable instructions to resolve an identified issue. See Event Procedures for complete information.
-
(Optional) Enter any collaboration and sharing options. For information about adding collaborators and sharing when creating a Sigma rule, see Share a New Entity. For existing Sigma rules, add or update collaboration settings from the More menu on the Rules page with either the Share or Manage collections option.
-
Click Upload rules.
Create a Sigma Rule with Regex
Sigma rules with regular expressions (Regex) can also be imported or created and used the same way as any other rule.
Creating a rule by adding the Sigma re modifier to a selection field name will trigger Graylog to interpret and craft the internal query with Regex. For example:
detection:
 selection:
 WorkstationName|re: '^[A-Za-z0-9]{16}$'
 condition: selection
This would result in the internal query: WorkstationName: /[A-Za-z0-9]{16}/
A large number of the rules published by SigmaHQ contain regular expressions that are not technically supported. We have added two cases where Graylog will translate the rules into Elasticsearch Regex dialect:
-
Digits:
\dwill be converted to[0-9] -
Anchors:
^$e.g.^<regex>$Elasticsearch syntax does not support anchor characters, but queries are anchored by default. Graylog will remove the unsupported anchor characters and add wildcards to achieve the same result.
-
^<regex>$will be converted to<regex> -
^<regex>will be converted to<regex>.* -
<regex>$will be converted to.*<regex>
For more information on anchoring, see the Elasticsearch documentation.
-
Regex Example
Here are some examples of how Regex can be used in Sigma rules:
-
A piece of malware is known to generate a .tmp file with a random eight character filename in the
\Windows\System32directory. We want to detect file creation for any .tmp files created in the\Windows\System32 directorythat are exactly eight characters long:
detection:
 selection:
 Image|endswith: '\svchost.exe'
 TargetFilename|re: '\\Windows\\System32\\[a-zA-Z0-9]{8}\.tmp$'
 condition: selection
-
An indicator of PowerShell abuse is very long commands. We want to detect any PowerShell commands that are 1000 characters or longer:
detection:
 selection_powershell:
 - CommandLine|contains:
 - 'powershell'
 - 'pwsh'
 selection_length:
 CommandLine|re: '.{1000,}'
 condition: all of selection*
Enable Sigma Rules
From the Sigma Rules page, you can then enable the added Sigma rules by toggling the Enable button. You can also use the Bulk Actions feature to enable, disable, or delete Sigma rules.
Create Sigma Correlation
You can enhance your detection coverage by configuring Sigma Correlations to detect multi-stage or chained threat activities. The process for adding a Correlation follows the same steps as adding standard Sigma rules. You can create one manually, import it from a public Git repository, or upload it from your local file system. Once added, you'll need to define the correlation logic that determines how individual events are linked, based on timing, field relationships, or shared attributes.
Correlate Events with event_count
When using event_count or value_count Correlation, the Sigma rule used for aggregation does not need to be enabled. This Correlation utilizes the rule solely to generate the underlying query logic and does not rely on the rule being active or generating events.
For example, to create an event_count Correlation that identifies multiple failed login attempts by a user, you would first define a Sigma rule that specifies the search conditions for a failed login event.
A rule meeting that criteria may look as follows:
title: Many failed logins
id: 0e95725d-7320-415d-80f7-004da920fc22
correlation:
    type: event_count
    rules:
        - failed-logon-attempt
    group-by:
        - user_name
    timespan: 5m
    condition:
        gte: 5
level: high
status: experimental
The rule is created to detect multiple failed logins and the YAML composition is explained as follows:
-
type: event_count
-
This parameter defines the type of Sigma correlation rule.
-
-
rules: failed-logon-attempt
-
This refers to a predefined detection Sigma rule name, think of it as the rule's logic source. It is the "name" field in the sigma rule, not "title". Also, the "id" of the rule can be used here as well.
-
-
group-by: user_name
-
The correlation is scoped per user. Graylog will count failed attempts per user.
-
-
timespan: 5m
-
The window to evaluate the events. In this example it is 5 minutes.
-
-
condition: gte: 5
-
If there are 5 or more matching events within that 5 minute window per user, the rule will trigger.
-
The level and status values are used for metadata, helpful for filtering and understanding the rule.
Correlate Events with temporal_ordered
When using temporal_ordered Correlations, the form is slightly different, as streams and search filters are not relevant. Those two fields are removed when a temporal_ordered rule is detected. When using temporal_ordered correlation, all referenced rules must be enabled because the correlation engine only works if each rule can actively generate events.
Because aliases are not supported, all rules in the sequence must use the same group-by field. The group-by field is used as the event key by the correlation engine to correlate events on the same field.
You can group results using any field in your data that has been indexed as a keyword or IP address.
temporal_ordered Example
In this scenario imagine you want to detect a successful login immediately after multiple failed attempts from the same user.To do this, you need two Sigma rules:
-
many-failed-logins: Detects 5+ failed logins by the same user in 5 minutes.
Copytitle: Many failed logins
name: many-failed-logins
id: 0e95725d-7320-415d-80f7-004da920fc22
correlation:
type: event_count
rules:
- failed-logon-attempt
group-by:
- user_name
timespan: 5m
condition:
gte: 5
level: high
status: experimental -
successful-login: Detects a successful login by that same user.
Copytitle: Successful Login After 5 Failed Attempts
id: 0e95725d-beef-415d-80f7-004da920fc22
correlation:
type: temporal_ordered
rules:
- many-failed-logins
- successful-login
group-by:
- user_name
timespan: 1m
You then configure a temporal_ordered Correlation titled Successful Login After 5 Failed Attempts, which refers to both the many-failed-logins and successful-login rules. This Correlation uses user_name as the group-by field and has a timespan of 1 minute, meaning the successful login must occur within one minute after the failed attempts for the correlation to trigger.
title: Successful Login After 5 Failed Attempts
id: 0e95725d-beef-415d-80f7-004da920fc22
correlation:
    type: temporal_ordered
    rules:
        - many-failed-logins
        - successful-login
    group-by:
        - user_name
timespan: 1mAssign Alerts to Sigma Rules
You can assign alerts for Sigma rules within the Sigma rules workflow. When you edit a Sigma rule, a Notifications field with a drop-down menu option appears. If you have existing alerts configured, they will appear in the Notifications field when creating or editing a Sigma rule.
Add Bulk Alerts
When importing one or more rules, you have the ability to add an alerts type in bulk to all rules by selecting your notification type then click the Use these settings on all rules button. Alternatively, individual notifications can be selected for each specific rule.
For existing rules, one or more can be selected, then click Bulk Actions > Add Notification. Here, you can select which notification types to add.
Apply Search Filters and Event Procedures
When creating or modifying a Sigma rule, you have the options to add event procedures or apply a search filter to the rule.
Add Event Procedure
You can add event procedures (represented as a text value) within sigma rules. This functionality allows you to outline actionable steps for security analysts to follow when an alert is triggered. When added, these event procedures are prominently displayed upon the triggering of security events, guiding you on the appropriate next steps to take.
For more information, see Event Procedures.
Apply a Search Filter
Search filters let you reuse query snippets to refine your search result. If you have properties that you frequently need to either include or exclude from event definitions, you can create them as search filters, which makes them easy to apply across different event definitions.
As an example, you may have a list of IP addresses for your internal users. For some events, you might want to omit this internal activity. You could create a search filter for this and use it in the event definition to eliminate any messages from those addresses. Having this query as a search filter lets you reuse it across different event definitions easily.
For more information about creating and applying search filters, see Search Filters.
Supported Sigma Rule Modifiers and Operators
Graylog Illuminate contains a lookup table that converts the most common fields present in Sigma rules from SigmaHQ repository to GIM fields. This conversion allows many rules to work seamlessly within the Graylog Illuminate processing system. If you want to customize this lookup table by adding or overriding translations, you can do so by following the instructions provided in the documentation.
Whenever a search query for Sigma rules is executed, the fields in the Sigma rule are translated using this lookup table. If the lookup table does not contain a value for a particular field, the field provided in the Sigma rule is used instead.
Components
| Component | Sigma Spec Requirement |
|---|---|
| Title |
required |
| Id |
optional |
| Related |
optional |
| Status |
optional |
| Description |
optional |
| Author |
optional |
| References |
optional |
| Log Source |
required |
| Category |
optional |
| Product |
optional |
| Service |
optional |
| Definition |
optional |
| Detection |
required |
| Search-Identifier |
optional |
{string-list}
|
optional |
{field: value}
|
optional |
| Timeframe |
optional |
| Condition |
required |
| Fields |
optional |
| False Positives |
optional |
| Level |
optional |
| Tags |
optional |
| [arbitrary custom fields] |
optional |
Special Field Values
| Special Field Values | Current Support |
|---|---|
|
|
Not Supported |
|
|
Not Supported |
| Value Modifiers | |
|
|
Supported |
|
|
Supported |
|
|
Not Supported |
|
|
Not Supported |
|
|
Supported |
|
|
Supported |
|
|
Not Supported |
|
|
Not Supported |
|
|
Not Supported |
|
|
Not Supported |
|
|
Not Supported |
|
|
Supported |
Expressions
| Expressions | Current Support |
|---|---|
|
Logical |
Supported |
|
|
Supported |
|
|
Not Supported |
|
|
Supported |
|
Negation with |
Supported |
|
Brackets (parenthesis) |
Supported |
|
Wildcards (e.g. |
Supported |
|
Pipe (deprecated) |
Not Supported |
|
Aggregation expression (deprecated) |
Not Supported |
|
Near aggregation expression (deprecated) |
Not Supported |
Further Reading
Explore the following additional resources and recommended readings to expand your knowledge on related topics:
