Set Up an Input
Before Graylog can begin collecting and processing log data, you need data flowing into the environment. You collect relevant data by creating an input—a defined entry point for incoming messages. Inputs specify how Graylog communicates with your data sources, allowing it to receive logs from a variety of servers, applications, or network devices.
This article guides you through the process of creating an input, configuring input parameters, and ensuring it is ready to receive data effectively.
Prerequisites
Before proceeding, ensure that the following prerequisites are met:
-
Ensure you have a log source capable of sending data in a format compatible with the selected Graylog input type. Refer to the documentation for your specific input type for detailed guidance on how to set up and configure it properly.
Launch a New Input
When you identify a log source from which you want to collect data, the next step is to configure an input. To initiate the input setup:
-
Navigate to System > Inputs.
-
Select and launch the input:
-
From the Select input dropdown, choose the desired input type (e.g. Syslog UDP, GELF TCP).
-
Select Launch new input .
-
Enter the required information to configure the input. Refer to the input documentation for specific configuration settings related to your input type.
-
Click Launch input.
-
-
Complete the Input Setup Wizard to start the input.
Hint: If you choose not to complete the setup wizard at this time, keep in mind that the input is not running and you receive a warning on the Inputs page that you have inputs in setup mode. You can start the Input Setup Wizard later from the table view by selecting the Set-up Input button.
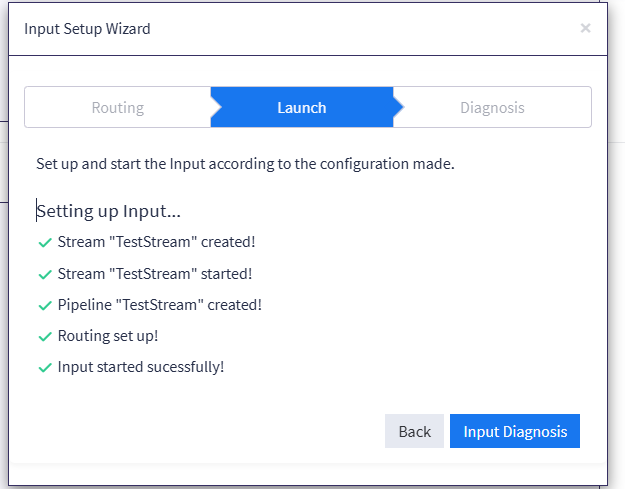
Set Up the Input
When you create the input, note that it is not in a running state until after you complete the Input Setup Wizard. Therefore, logs are not yet flowing from your log source into Graylog. The setup wizard opens automatically when you create a new input. Use the wizard to complete input configuration and data routing.
The wizard consists of three parts, as follows:
-
Make your Illuminate pack selections.
If applicable Illuminate content exists, you should select it so that ingested log data is routed by the Illuminate processors to the associated Illuminate stream and index set.
If Illuminate content does not exist or is not available, select Skip Illuminate to configure your data routing preferences.
-
Determine your Data Routing process flow.
You have the options to either route your data to a new stream (recommended) or to an existing stream. As part of the routing configuration, you are also able to create a pipeline and index sets.
If you route your data to an existing stream, note that configurations attached to that stream also apply.
-
Review the input diagnosis page.
The setup process ends with the Input Diagnosis page, which provides confirmation messages and metrics if the input launched successfully, and suggestions for troubleshooting if any issues are detected.
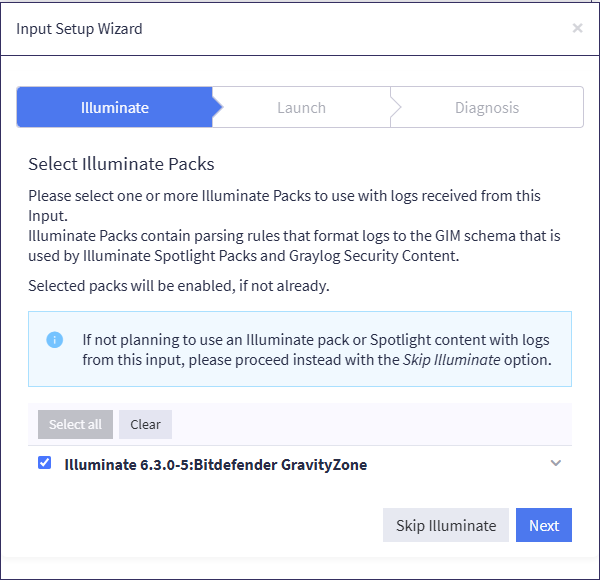
Select Illuminate Packs
Input setup mode begins by presenting applicable Illuminate processing and spotlight packs associated with the selected input. Illuminate processing packs contain parsing rules that translate incoming log data into the Graylog Information Model (GIM) Schema, providing normalization and enrichment of log data. Spotlight packs install relevant dashboards, Sigma rules, and events that read logs parsed by Illuminate to the GIM schema.
For example, if you are setting up the CrowdStrike input, the wizard lets you select the CrowdStrike Illuminate processing and spotlight packs. However, if you select a GELF HTTP input, no processing or spotlight packs are listed because Illuminate has no associated content specific to the generic GELF HTTP input.
Below are the two options available with the Illuminate process flow in the input setup wizard:
Select Illuminate Packs
-
Select the Illuminate processing packs for your input. If an Illuminate pack is available, we recommend you include it to enhance data parsing and enrichment.
-
Select Next.
-
If a spotlight pack is available, it appears already selected. Select Next to include the pack.
-
(Optional) Add collaboration and sharing options for the Illuminate content, then select Next. See Share a New Entity for details.
-
Select Start Input to launch the input.
When you include Illuminate packs, you don't create separate stream or pipeline rules. Instead, messages from the input are routed by Illuminate processors to the corresponding Illuminate stream. The input is configured based on the associated Illuminate packs.
Skip Illuminate Packs
Select Skip Illuminate if no Illuminate packs are available for the selected input or you choose not to use Illuminate processing. This option sends you to the routing configuration workflow without enabling any Illuminate packs.
Configure Data Routing
If you do not select any Illuminate packs, you must configure how incoming data should be routed. You have two routing options: route to a new stream or route to an existing stream.
Route to a New Stream
Choose this option to create a dedicated stream for the input.
-
Select Create Stream.
-
Provide the following information:
-
Title: Enter a name for the new stream.
-
Description: Enter a description of the messages routed to this stream.
-
Index Set: Select an existing index set or create a new one. We recommend that you create a new index for each input. However, note when you select the option here, Graylog opens a new tab in which you must complete the Configure Index Set workflow. After you save the new index set, you can return and select it from the dropdown.
-
Optionally, you can also create a new pipeline associated with this stream for further message processing. This option is selected by default.
-
-
Select Next, then select Start Input to apply the configurations and start the input based on the selected settings.
If you choose to route to a new stream, messages are routed from the default stream to your new stream via a system-generated pipeline rule in the All Messages default pipeline.
Route to an Existing Stream
Select this option to route messages to an existing stream.
-
Select Select Stream.
-
Choose the desired stream from the list of existing streams.
-
Select Next, then select Start Input to apply the configurations and start the input based on the selected settings.
If the input already has associated stream rules or routing rules, a warning message is displayed.
Input Diagnosis
The final step in the setup process is to verify the launched input details on the Input Diagnosis page. This page provides insights into the status and health of the newly launched input. This step ensures that the input is functioning as expected and helps quickly identify and resolve any issues.
The Input Diagnosis page provides information about the address of the input, running nodes, health check metrics, connection status, error reporting, message traffic, and suggested fixes for common problems. Completing the diagnosis step is essential to validate that your input is correctly configured and ready to receive and process log data. If errors are reported, they should be addressed before considering the setup process complete.
After you complete the input setup, you can access the Input Diagnosis page for your specific inputs as follows:
-
Navigate to System > Inputs.
-
Locate the input, then click the More actions dropdown.
-
Select Input Diagnosis.
Manage Inputs
The Inputs page (System > Inputs) provides useful information about all of your inputs as well as being the place to perform management or maintenance activities. The top of the page provides two tabs:
-
Inputs: This view is the default where you create new inputs and where the table view shows your created inputs.
-
Forwarder Inputs: Use this tab to view inputs configured through the Graylog Forwarder. Note that inputs used through a Forwarder must be associated with a Forwarder input profile. See Configure Forwarder Input Profiles for complete details.
The Inputs Tab
The table on the Inputs tab lists all standard inputs you have created. Use the Columns dropdown at the upper-right of the table to customize what information displays. Note that some columns do not show by default.
On the right side of the table, you can find actions to perform for each input. Many of the actions are typical management functions, such as starting or stopping an input, and editing or deleting an input.
Click within an input row to view expanded information for the input. This view shows the configuration information as well as metrics and other relevant information.
Select Received messages to view the log data ingested via an input. This action takes you to the Search page showing the messages from the specified input.
The Forwarder Inputs Tab
The Forwarder Inputs tab displays a table of all inputs that are configured through Forwarders. Much of the information displayed is specific to Forwarders and Forwarder input profiles, although you can also find the details for the specific inputs.
Select the link in the Input Profile column to view the profile overview page. This page shows all inputs that are attached to this profile as well as all Forwarders to which the profile is attached. Use this page to edit or delete existing inputs or add new inputs to the profile. You can also add the profile to new Forwarders.
Select the link in the Forwarder column to view the Forwarder detail page. This page shows information and status of the Forwarder itself along with limited traffic metrics. It also shows each input that is attached via an input profile and the status of whether the input is running or not.
Further Reading
Explore the following additional resources and recommended readings to expand your knowledge on related topics:
