In Graylog, a stream represents a filtered subset of your log data that matches specific conditions defined by you. Streams use both stream rules and pipeline rules to filter messages based on criteria like message source, severity, or content. By doing this, they effectively organize and direct log data to different streams for tailored processing, storage, or further analysis.
Key Concepts
The following key concepts are essential to understanding and using streams in Graylog.
The Default Stream
In Graylog, the default stream is a built-in stream that automatically receives all messages or logs that do not match any other configured stream rules. This stream is called "All messages," and it serves as a catch-all for any incoming log data. This stream cannot be deleted or paused.
All incoming messages are directed to this stream unless they match a specific rule for a custom stream. You can create additional streams with specific rules to categorize or filter log messages, but anything that does not match those rules is still routed to the default stream.
Stream Rules
Stream rules are conditions used to filter log messages directly from inputs into a given stream. These rules help determine which messages should be routed to a particular stream by evaluating the content of the log messages in real-time. A stream rule can be based on multiple criteria, such as message fields, values, keywords, or other specific conditions.
Each stream can have multiple rules, and they can be combined using logical operators like AND or OR. For example, stream rules might filter logs by attributes like the source of the message, severity level, or specific text within the message content.
Streams and Pipeline Rules
Pipelines, which contain a sequence of pipeline rules, can be attached to a stream. Pipeline rules are programmatic actions applied to messages. They can be used like stream rules and can direct messages to different streams; however, they can also be used for enrichment tasks, such as extracting fields from messages, renaming fields, performing transforms on messages, and much more. To learn about attaching pipelines to streams, read the Data Routing documentation.
Streams vs. Saved Searches
The biggest difference between streams and saved searches is that streams are processed in real time. This processing allows for real-time alerting and forwarding to other systems. Imagine forwarding your database errors to another system or writing them to a file by regularly reading them from the message store. Streams can do this job much better.
Another difference is that searches for complex stream rule sets are generally a lower cost operation to perform because a message is already tagged with stream IDs when processed. Building a query with all rules would cause a significantly higher load on message storage.
Manage Streams
You can manage existing streams on the Streams page from the top-level menu.
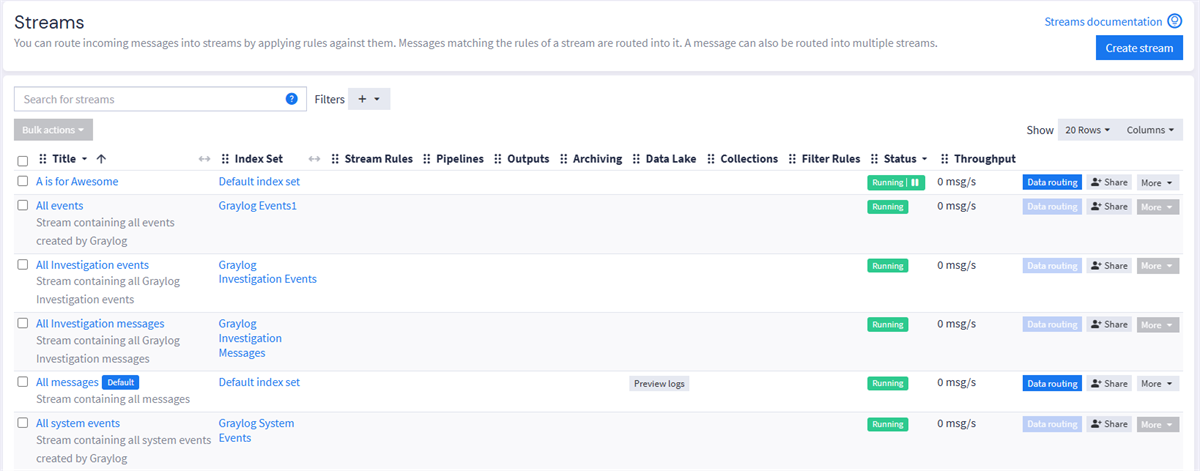
The Streams page in Graylog is a central hub for creating and modifying streams. For each of your streams, key attributes are listed:
-
Stream Rules: Displays the number of stream rules attached to the stream. Expand the row to view information about specific rules.
-
Pipelines: Displays the number of pipelines attached to the stream.
-
Outputs: Displays the number of outputs attached to the stream.
-
Archiving: Indicates whether archiving has been enabled for index sets attached to this stream.
-
Data Lake: Indicates whether a Data Lake has been established as a destination for logs in this stream. Select Preview logs to go to the Data Lake Preview page.
Hint: Data Lake is a Graylog Enterprise feature. A valid Graylog Enterprise license is required. Graylog Open users do not see this column. -
Collections: Shows the number of collections the stream has been added to. Expand the row to view the specific collections.
Hint: Collections is a Graylog Enterprise feature. A valid Graylog Enterprise license is required. Graylog Open users do not see this column. -
Filter Rules: Displays the number of data routing filter rules attached to the stream. Expand the row to view information about specific rules.
-
Status: Displays whether the stream is Running, which indicates that the stream is live and may have data routed through it, or Paused, which indicates the stream is no longer active.
-
Throughput: Shows the rate at which messages are processed and ingested by Graylog in this stream.
Use the Columns dropdown at the upper-left of each table to customize which information appears. Note that some columns do not appear by default. You can drag columns to reorder as you like.
Stream Actions
On the right side of the table, you can find actions to perform for each stream. Note that many of these actions are found under the More menu.
Many of the actions are typical management functions, such as starting or stopping a stream, and editing, cloning, or deleting a stream. Additional actions include:
-
Data Routing: Select the Data Routing action to configure data routing processes, including stream rules, pipelines, filter rules, and destinations.
-
Share: Select Share to add collaboration and sharing options to a stream. See Manage Sharing for Users and Teams for complete details.
-
Manage Rules: Shows all streams rules for the stream. You can edit or delete existing rules and add new rules from this page.
-
Manage Outputs: Shows all outputs assigned to the stream. You can edit or delete assigned outputs, and you can create new outputs or assign existing outputs to the stream.
-
Manage Categories: Enables you to assign categories to the stream from a predefined list. To add your own categories, type text in the field, then hit Enter. Stream categories can be used to limit searches on the Search page.
-
Manage Collections: Allows you to add the stream to an existing collection.
Create a New Stream
To create a new stream to route your log data:
-
Navigate to the Streams tab at the top of the page.
-
Select Create stream.
-
Create a unique title and description for your stream, e.g. All error messages or Catching all error messages from all sources.
-
Specify the index set to which logs from this stream will be written.
Hint: By default, upon creating a new stream, you must specify an index set as the destination for your logs within that stream; however, you can opt to use Data Routing to modify this destination, including routing logs in a stream to a Data Lake or an output. -
(Optional) Select Remove matches from 'Default Stream' to have this stream not route messages to the default stream.
-
(Optional) Enter any collaboration and sharing options. For information about adding collaborators and sharing when creating a stream, see Share a New Entity. For existing streams, add or update collaboration settings from the More menu on the Streams page with either the Share or Manage collections option.
-
Select Create stream. At this point, the stream has been saved but is not yet active, meaning that log data is not moving into or out of the stream.
-
Refine the conditions that determine what data is filtered through this stream by applying stream rules. See the following section for more information on this process.
-
Enable the stream by selecting the Paused button, which displays as Running when the stream is active and data is flowing through the stream.

Create and Modify Stream Rules
Stream rules determine what log data is routed to your streams. Applying stream rules to a stream can be done via the Manage Rules menu or by selecting Quick add rule from the stream action menu.
Create Rule via Manage Rules
After initially creating a new stream, you can create the rules that filter your desired logs through this stream. To do so:
-
From the Streams page, locate the stream you wish to modify and select More.
-
From this menu, select Manage Rules.
-
In the first section, 1. Load a message to test rules, select a recent log message to load and test against the rule you are creating. To do so:
-
Determine first if you want to load a recent message from a server or forwarder input.
-
Under Recent Message, select the input type you want to load the log message from.
-
Select an available input applicable to that type containing log data you wish to test against.
-
Select Load Message to view recent log data available via this input.
-
Find and select a relevant log from the list of available logs for testing.
Or, you may wish to select a log message by providing a message ID.
-
Select the Message ID tab to toggle to the message ID menu.
-
Manually enter the correct message ID and index in which this log is contained.
-
Select Load Message to view recent log data available via this input.
-
-
-
Now that you have selected a log against which to test your stream rule, proceed to the 2. Manage stream rules section and click Add stream rule.
-
Here you will create a new stream rule to filter log data to this stream. To create a rule, complete the following fields:
-
Field: Determine the field type that serves as a basis for establishing the rule. For example, to filter all logs from a specific IP address, select
source_ipas your field type. -
Type: Determine how the rule should evaluate whether the log data should assess the field type you've selected in the previous step. As in the previous example, you may opt to select match exactly so that messages that exactly contain this IP address are filtered into this stream. Or, if the field type you've selected could contain a range of values, you may select greater than or smaller than to determine a range of accepted values for this stream.
-
Value: Enter the desired value for log data filtered to this stream. As in the first example of an IP address, you would enter the address exactly in this field.
-
Inverted: Selecting inverted means that your value is now an exclusionary condition. For example, if you enter an IP address in the value field, then log data containing this address will not be filtered into this stream.
-
Description (optional): Add a description for this stream rule if desired.
-
-
Click Create Rule. Your new rule is now listed in the Manage Rules section.
-
To add additional stream rules, select Add stream rule and repeat the process in step 5 as many times as necessary to create the set of filter conditions you desire for this stream.
-
Determine for the log data in this stream whether a log message must match all of the rules you have created or at least one of the rules in order to be included in the stream by making the appropriate selection under 2. Manage stream rules.
-
Select I'm done! to complete.
You may also modify and add new stream rules at a later date via this same menu. To edit an existing rule, select the edit button next to the stream rule. You may also delete stream rules as needed.
Create Rule via Quick Add Rule
If you would like to quickly add a new rule to a stream without accessing the Manage Rules menu:
-
From the Streams page, locate the stream you wish to modify and select More.
-
From this menu, select Quick add rule.
-
Here you will can add a new stream rule to filter log data to this stream. Follow the instructions in step 5 of the previous section to create your new rule.
-
Click Create Rule to complete.
To edit or delete this rule in future, you must modify it from the Manage Rules menu by locating the stream in the Streams menu and selecting More > Manage Rules.
Route Logs From a Stream
Streams are essential to routing logs through Graylog, and Data Routing as a process begins at the level of an individual stream. To learn more about how to set up Data Routing, including adding destinations to your stream, see Data Routing.
