Manage Watchlists
Graylog provides seven built-in watchlists (IP, User, File Hash, Port, Domain, GeoLocation, and File) that flag matching values in your log messages and can be referenced in searches, dashboards, event definitions, and pipeline rules. You manage the entries in each watchlist and control how long they remain on the list. This article explains how to view watchlists, set a default expiry, add and remove entries, and use a watchlist as a query parameter.
Prerequisites
Before proceeding, ensure that the following prerequisites are met:
-
You have a valid Graylog Security license.
-
You have the
watchlist:readpermission to view watchlists, thewatchlist:editpermission to add entries or change the default TTL, and thewatchlist:deletepermission to remove entries. -
You are familiar with the watchlist types, accepted values, and matching rules described in Watchlists.
View Watchlists
To view your watchlists and their entries:
-
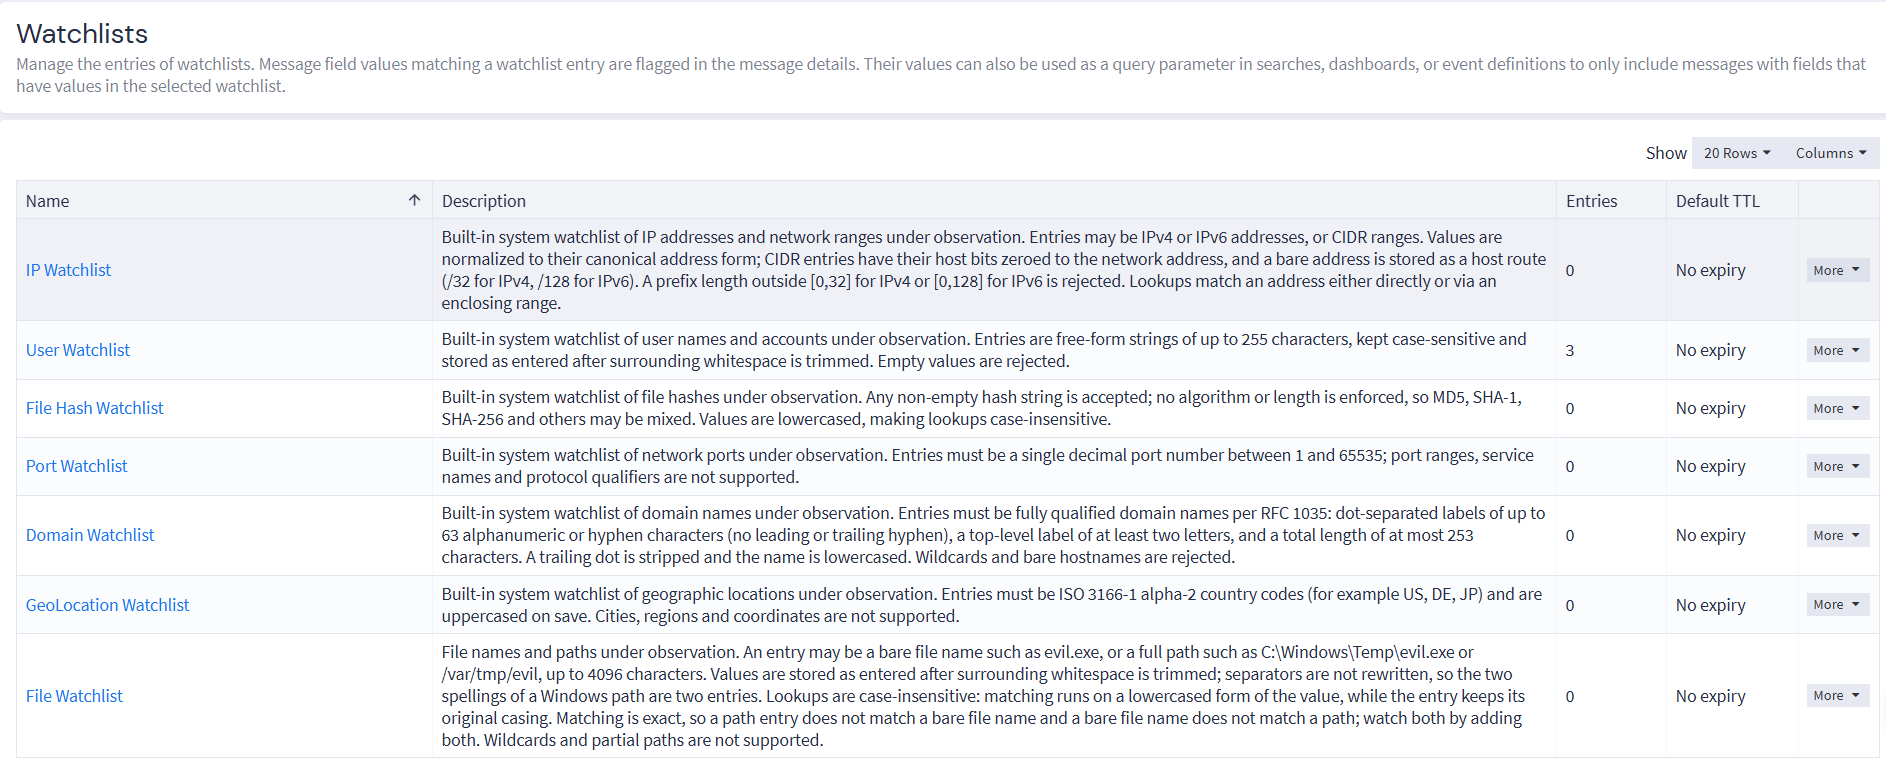
Navigate to Security > Watchlists. The overview lists each watchlist type, description, current number of entries, and default TTL.
-
Click a watchlist name to open its detail page. The detail page lists the watchlist's entries in a table with a Value column and an Expires column. Entries that never expire show No expiry.
-
(Optional) Enter a value in the Search entries field to filter the list, or click a column heading to sort by value or expiry.
Set a Default TTL
The default TTL determines how long new entries remain on a watchlist when you add them without specifying their own TTL. Changing the default TTL does not change the expiry of existing entries.
To set a watchlist's default TTL, navigate to Security > Watchlists:
-
In the row of the watchlist you want to change, click the More dropdown menu and select Set default TTL.
-
Enter the TTL. Enter 0 if new entries should never expire by default.
-
Click Save.
Add Entries to a Watchlist
You can add one or multiple entries from the watchlist detail page.
To add entries, navigate to Security > Watchlists:
-
Click the name of the watchlist you want to add entries to.
-
Click Add entries.
-
In the Values field, enter the values to add, one per line or separated by commas.
-
(Optional) Change the TTL for this batch of entries. The field is prefilled with the watchlist's default TTL. Leave it unchanged to apply the default, or enter 0 to make these entries permanent.
-
Click Add entries.
Graylog reports how many entries were added and lists any rejected values with the reason for each rejection. Valid values are added even if other values in the batch are rejected.
Important: Each watchlist type accepts only specific value formats. For example, the Domain watchlist rejects wildcards, and the GeoLocation watchlist accepts only two-letter country codes. See Watchlists for the accepted values for each type.
Remove Entries From a Watchlist
To remove entries, navigate to Security > Watchlists:
-
Click the watchlist you want to remove entries from.
-
Remove the entries in one of the following ways:
-
To remove a single entry, click the More dropdown menu in the entry's row and select Delete.
-
To remove several entries, select their checkboxes, then select Bulk actions > Delete.
-
-
Confirm the deletion.
Add or Remove Values From Search Results
You can also add or remove individual values while you review search results. This works for the fields that Graylog checks against watchlists, such as source_ip, user_name, and destination_port. For the full list, see Watchlists.
To add or remove a value from a search result:
-
In the Search page, click a field value in a message.
-
Select Add to <Watchlist> or Remove from <Watchlist>, where <Watchlist> is the watchlist that matches the field type.
The actions you see depend on your permissions and on whether the value is already on the watchlist.
You can also remove a value from the Found on watchlist section of a message's details. If an IP address matched through a CIDR range, removing it from the message details removes the entire range. Graylog asks you to confirm before it removes the range.
Hint: Field values that are arrays cannot be added or removed from search results. Use the watchlist detail page instead.
Use a Watchlist as a Query Parameter
A watchlist parameter inserts a watchlist's current entries into a query when it runs, so you can include or exclude watched values without updating the query.
If you upgraded from an earlier version, lookup table parameters that referenced the legacy watchlist lookup table with the ip, user, or hash key were converted to Watchlist parameters automatically. You do not need to recreate them.
Add a Watchlist Parameter to a Search or Dashboard
To add a watchlist parameter to a search or dashboard:
-
In the search or dashboard, open the parameter declaration.
-
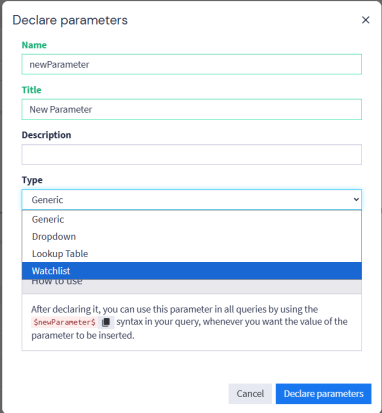
Add a parameter and select Watchlist as its type.
-
Enter a name for the parameter.
-
Select the watchlist the parameter uses.
-
Save the parameter.
-
Reference the parameter on the right-hand side of a field query, in the format
field:$parameter_name$.
For example, to find logins by users on the User Watchlist, enter the following query:
user_name:$watched_users$ AND action:loginTo exclude watched values instead, negate the field query, for example NOT source_ip:$trusted_ips$.
Add a Watchlist Parameter to an Event Definition
To add a watchlist parameter to an event definition:
-
Navigate to Alerts > Event Definitions, and create or edit an event definition.
-
In the Filter & Aggregation step, add a query parameter and select Watchlist as the parameter type.
-
Select the watchlist the parameter uses.
-
Reference the parameter in the search query, in the format
field:$parameter_name$. -
Complete the remaining event definition steps and save.
Watchlist Parameter Limits
Keep the following limits in mind when you use watchlist parameters:
-
A watchlist parameter expands to a maximum of 1,000 entries.
-
Your search backend's
indices.query.bool.max_clause_countandmax_query_string_lengthlimits still apply. A large expansion combined with a complex query can exceed them and cause the search to fail. -
If the watchlist is empty, or the referenced watchlist no longer exists, the parameter's default value is used.
-
CIDR entries are inserted as literal text. They match as ranges only if the field is mapped as the
iptype in the index set, for example through a custom field mapping or an index field type profile. If the field is mapped as any other type, such askeywordortext, a CIDR entry matches only its exact literal string, for example10.0.0.0/8, so only exact address entries match individual addresses. For reliable range matching regardless of mapping, use thewatchlist_contains()pipeline function instead.
Manage Watchlists With the REST API
You can also manage watchlists through the Graylog REST API. All endpoints require authentication and a valid Graylog Security license, and use the following base path: /api/plugins/org.graylog.plugins.watchlist/v2/watchlists
|
Method |
Path |
Permission |
Description |
|---|---|---|---|
|
|
|
|
List all watchlists. |
|
|
|
|
Get one watchlist. |
|
|
|
|
Set the watchlist's default TTL. |
|
|
|
|
List all entries without pagination. |
|
|
|
|
List entries with pagination, sorting, and search. |
|
|
|
|
Add entries. |
|
|
|
|
Remove entries by value. |
|
|
|
|
Check field values against one watchlist or all watchlists of a type. |
For example, to add two entries with a one-hour TTL to a watchlist, run the following command:
curl -u <username>:<password> -X POST -H 'Content-Type: application/json' \
  'https://<graylog-host>:9000/api/plugins/org.graylog.plugins.watchlist/v2/watchlists/<watchlist-id>/entries' \
  -d '{"values": ["10.20.30.40", "192.168.1.0/24"], "ttl_seconds": 3600}'
The response reports the number of entries added and lists any rejected values:
{ "added_count": 2, "errors": {} }
When you remove entries through the API, Graylog matches each value by its normalized form, so 10.20.30.40 and 010.020.030.040 remove the same entry. Removing an IP address that is covered only by a CIDR range does not remove the range, so the address continues to match. To clear the match, remove the range itself. This differs from removing a value in the message details view, which removes the entire range.
Important: The earlier watchlist endpoints still work and write to the new watchlists, but they are deprecated and will be removed in the next major release. Replace them with the v2 endpoints:
|
Deprecated endpoint |
Replacement |
|---|---|
|
|
|
|
|
|
|
|
|
Troubleshooting and Common Issues
The following section outlines troubleshooting steps for common issues to assist you in resolving potential challenges you may encounter.
Issue: Value on a Watchlist Is Not Flagged in Message Details
The value is in a field that Graylog does not check for that watchlist type, or the entry has expired.
Solution: Confirm that the value is in one of the fields checked for that type and that the entry has not expired.
Issue: User Name on the Watchlist Does Not Match
The entry does not match the full field value. Case is not the cause, because user entries are case-insensitive.
Solution: Add the value exactly as it appears in the field, including any domain prefix such as CORP\jsmith, and confirm that the entry has not expired.
Issue: Removing an IP Address Removed a Different Value
The address matched through a CIDR range, so Graylog removed the entire range.
Solution: Add the range again from the watchlist detail page.
Issue: Search With a Watchlist Parameter Fails
The watchlist has more than 1,000 entries, or the expanded query exceeds your search backend's clause count or query length limits.
Solution: Reduce the number of entries, or use the watchlist_contains() pipeline function instead.
Issue: Match Persists After Changing a CIDR Range
Each Graylog node caches match results briefly.
Solution: Wait up to a minute for all nodes to reflect the change.
Issue: IP Address Still Matches After Removing It Through the API
A CIDR range that contains the address is still on the IP Watchlist, and removing an address through the REST API does not remove that range.
Solution: Remove the range itself, or remove the address from the message details view, which removes the entire range.
Issue: Pipeline Rule Does Not Reflect Watchlist Changes After Upgrading
The rule reads the legacy watchlist lookup table with a lookup_* function, and watchlists no longer use that table after the upgrade to Graylog 7.2.
Solution: Update the rule to use watchlist_contains(), watchlist_add(), or watchlist_remove(). For details, see Watchlists
Further Reading
Explore the following additional resources and recommended readings to expand your knowledge on related topics: