Log messages that Graylog receives typically consist of multiple fields. You can see the field types a message contains in search results or some dashboard widgets.
Field type refers to the data type of each field in a log message. A field type might be a string, boolean, or number, for instance. The field type then determines how the data is displayed, like in a dashboard. For example, you might choose to display a URL as a string.
Manage Field Mappings
The field type is assigned when Graylog receives a message. However, for a given field, the received field type might not match the way you want to work with the data.
Field mapping allows you to change the field type on specific fields for incoming log messages. You may pair a field with a field type. For example the field host_ip could be mapped to the field type IP.
Field types can be changed by selecting Change field type in the drop-down menu presented when you click any field name in your search results. The current field type is displayed at the top of this menu. To create a new field mapping:
-
Click Change field type and select a new field type in the dialog box that appears.
-
Select the index sets you want to include. By default, field type changes are applied to all index sets of the current message or search.
-
Select the Rotate affected indices after change option to ensure that the selected indices are rotated when the field type is changed. In this case, the rotation is done immediately without waiting for the end of the rotation cycle.
-
Click Change field type.
Warning: Changing the field type can have a significant impact on log ingestion. Selecting a field type that is incompatible with the logs you are ingesting could lead to ingestion errors. Make sure that you enable Failure Processing and that the Processing and Indexing Failures stream is watched closely afterward.
Use Case
A user has ingested log messages that contain an IP address in the client_ip field. This field is indexed as keyword by default. The user can select this field and change its type to ip in the user interface. After performing the change and completing the index rotation cycle, the index mapping template is modified by Graylog so that the client_ip field is indexed as ip.
Override Field Mappings
The origins of indexes and profiles are listed on the Configurations page. You can override origin values with custom mappings as follows:
-
Select Edit for the field you want to override. This action is available for both profiles and index values.
-
Choose the new field type from the drop-down menu in the Change Field Type dialog box.
-
Select the Rotate affected indices after change option to ensure that the selected indices are rotated when the field type is changed. If you clear this check box, you must manually rotate indices for the change to take effect.
-
Click Change field type.
This procedure does not remove or delete fields. You can override an index or profile temporarily and then the field value may be reset. An index or profile that is overridden is displayed on the Configurations page as an overridden index or overridden profile. You can also filter based on whether an index or profile is the origin or overridden.
You may use the Bulk actions button to remove multiple field mappings from an index or profile that is overridden.
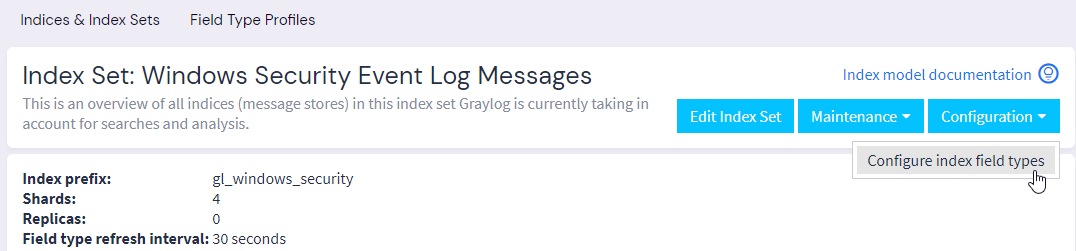
Configure Index Field Types
You can manage field types for indices from the Indices & Index Sets tab of the Indices page. To view the configuration page for an index set:
-
Select the index set you want to manage to open the Overview page. Each index set page displays an overview of all included indices along with other configuration detail.
-
Click the Configuration menu found in the upper right corner of the detail page, then select Configure index field types.
-
The configuration page lists all associated field type mappings and provides details, such as the origin. Click an event in the Origin column to view information about the source of the field type.
-
To modify a mapping:
-
Click the corresponding Edit button at the end of the row. Reserved fields cannot be edited.
-
Select a new field type in the dialog box that appears.
We recommend that you take care when selecting new field types because this action could have a large impact on the ingestion of future log messages.
-
Index Set Profiles
Index set profiles let you preserve custom field mappings that you can then assign to any index set. Profiles help you establish a central and consistent data model for incoming log messages, instead of requiring you to recreate field type mappings for every new index set.
You can manage field types on the Configure Field Type page, where you can view information about the fields related to an index set.
Create a Field Type Profile
Create new field type profiles on the Indices & Index Sets page under System > Indices.
-
Select the Field Type Profiles tab.
-
Click Create profile.
-
Enter a profile name and (optional) description.
-
Use the drop-down menus to set up field type mappings by selecting a field name (or creating one) on the left and selecting a field type on the right.
-
(Optional) Click Add mapping to include additional mappings for this profile.
-
Click Create profile.
You can also create a profile on the Field Type Configuration page:
-
Go to System > Indices.
-
Select any index set to load its detail page.
-
Select Configure index field types from the Configuration menu at the top right.
-
Select the fields to include in the mapping. You can select multiple fields across pages if necessary.
-
Select Create new profile on the Bulk actions menu.
-
Enter a profile name and (optional) description.
-
Adjust the field names and field types as required under Set up mappings. You can also add fields by clicking Add mappings.
-
Click Create profile.
Warning: Changing the field type can have a significant impact on log ingestion. Selecting a field type that is incompatible with the logs you are ingesting could lead to ingestion errors. It is recommended that Failure Processing is enabled and that the Processing and Indexing Failures stream is watched closely afterward.
With either method, the profile is created but not assigned to an index set. You can view and edit profiles in the Field Type Profiles tab.
Assign a Profile to an Index Set
You can assign a field type profile from the Indices & Index Sets page under System > Indices:
-
Click Edit in the index set you wish to update.
-
Under Index Set Profile, select the desired profile from the drop-down menu.
-
Click Update index set.
After you assign a profile to an index set, you must rotate the indices before the changes are effective. To do so:
-
Go to the index set detail page.
-
Select Rotate active write index from the Maintenance menu.
You can also assign or remove a profile via the Field Type Configuration page:
-
Select any index set from the Indices & Index Sets page (under System > Indices), to load its detail page.
-
Select Configure index field typesfrom the Configuration menu at the top right.
-
Click the Edit icon for the Field type mapping profile field.
-
In the dialog box, select the desired profile from the drop-down menu.
-
Click Set profile.
When you have a profile assigned to an index set, you can temporarily override the profile settings on the Configurations page, as described above. This capability is useful if you need to perform specific searches with different settings without changing your profile settings.
Manage Field Type Profiles
The Field Type Profiles tab is where you can create, view, and manage index set field type profiles. The list view shows all your profiles. Use the filter to limit the list or find specific profiles by keyword.
The Custom Field Mappings column shows the number of custom field mappings that are present. You can click the number to see the mappings. The list view also shows any index sets the profile is assigned to.
As with other entity lists in Graylog, you can show or hide columns and modify the way they are sorted. As described above, you can create a new profile by clicking Create profile.
Edit a Profile
Warning: Be careful when updating or removing profiles that are currently assigned to index sets to avoid unintended results.
You can edit profiles in the Field Type Profiles tab. Click Edit on a profile, then update the information. You can change existing field type mappings as well as add or delete mappings.
You can also remove any profile on this page. Select More > Delete from the list view to permanently remove a profile.