The Graylog REST API provides the full functionality of the Graylog web UI. The REST API lets you automate frequently repeated processes and allows for integration with third-party applications.
You can access the REST API through the API browser, which is useful for simple, individual requests. However, for more advanced uses, you’ll need a programmatic approach that allows you to build workflows and repeat your processes as needed.
This article demonstrates how you can use the API browser as a starting point for building complex API requests, which you can incorporate within your chosen development environment.
Prerequisites
Before proceeding, ensure that the following prerequisites are met:
-
You must have appropriate user credentials for your Graylog instance.
-
An access token is recommended to avoid sending credentials as plain text. Admin users can create access tokens for themselves and other users. See REST API Access Tokens for complete information.
-
You will need access to a command-line interface (CLI) or scripting environment from which to run commands or API calls.
-
Ensure you have access to the API browser to discover available endpoints and methods. See API Browser for complete information.
Choose Your Tools
To get the full benefits of the REST API for automation and integration, you need to use some form of development tool to perform API calls. You might make requests from the command line with a tool such as curl, or you could use a scripting or programming language. Some languages have the ability to make direct API calls while in others you can wrap a command-line call, such as a curl request, within your code.
You have many choices, and your specific use case as well as personal preference and experience will determine the best options for your environment.
Note that you can also download the entire Graylog REST API specification, either as JSON or YAML, which can be useful to integrate with other tools. To do so, go to the API browser, then select the format from the dropdown at the upper right. The download begins automatically.
Support from the API Browser
The use cases and examples below demonstrate how you can use the API browser to learn about the methods and endpoints available to you in Graylog. These examples also show how you can find required information for parameters.
The Graylog REST API includes more than 200 endpoints. Most endpoints include multiple methods (GET and POST, for example). Often endpoints have multiple commands for the same method type (like two or three different POST commands on an endpoint). Remember, any function you can perform through the Graylog web interface you can also perform through the API. In other words, the API provides a lot of functionality.
Use the API browser to familiarize yourself with the capabilities available through the API and to learn parameters and syntax required for individual methods. For more information, see API Browser as well as the uses cases below.
Example Uses Cases
The Graylog REST API allows GET, POST, PUT, and DELETE methods. The use cases and code examples below demonstrate how to construct a variety of command line calls to the REST API by first finding endpoints and methods and their parameters through the API browser.
Hint: The code examples presented below use the curl command-line tool because it is a common tool used with REST APIs. Remember that you have many options for tools to use in your own environments. If you use something different, you need to adjust the code examples presented here accordingly.
Example 1: Method Types
The following examples demonstrate how to construct basic GET, POST, and PUT requests on the command line using curl.
GET
The GET command is the most basic method you can run. The GET command retrieves or “gets” information from Graylog without modifying data or settings.
The GET command is a way to look at what is going on in your Graylog environment. It is also a useful method to find information you need for other commands.
The following GET command retrieves information about all nodes in the Graylog environment:
curl -u UseYourValidToken:token -H "Accept: application/json" -X GET http://localhost:9000/api/cluster?pretty=trueIn the above code, be sure to insert your own generated access token in place of the example shown.
The curl command provides all the required information as part of curl options. The following information is sent to the API through this command:
-
-u: This option signals user authentication. Following security best practice, the authentication is done via a generated access token. See REST API Access Tokens for complete information.Hint: It is possible, though not recommended, to use a username and password for authentication instead of an access token:
-u <username>:<password>. -
-H: This option is used to supply headers. This command includes the Accept header, which tells the API how the response should be formatted (in this case, as JSON data). -
-X: This option indicates the request (or command) type, as in this case the GET command. - The URL: Although curl has a URL flag (
--url), it is optional and typically omitted. The URL itself, however, is required, which consists of:The access point for the API,
host:port/api/.The endpoint,
cluster.Finally, to return data in a more easily readable format, include the optional
pretty=trueparameter, appended with the?character.
When you run this command, the JSON-formatted output provides general Graylog cluster information such as the following:
{
"e31af544-9183-4b88-b833-37f89ed7acc0" : {
"facility" : "graylog-server",
"codename" : "Noir",
"node_id" : "***********************************************",
"cluster_id" : "**********************************************",
"version" : "7.2.0+2c5da04",
"started_at" : "****-**-**T17:46:17.818Z",
"hostname" : "gl-latest-live",
"lifecycle" : "running",
"lb_status" : "alive",
"timezone" : "America/Chicago",
"operating_system" : "Linux 5.10.0-28-amd64",
"is_leader" : true,
"is_processing" : true
}
POST
The POST command allows you to tell Graylog to perform an action. Typically, actions include creating entities (index sets or streams, for example) or triggering a job. POST commands usually require more options than GET commands.
The following POST example triggers a system job that scans every index and stores information about what indices contain messages and in what time ranges.
curl -u UseYourValidToken:token -H "X-Requested-By: XMLHttpRequest" -X POST http://localhost:9000/api/system/indices/ranges/rebuildIn the above code, be sure to insert your own generated access token in place of the example shown.
In this example, the command provides the following information:
-
-u: User authentication. See the GET command above for details. -
-H: This option is used to supply headers. This command includes the X-Requested-By header, which specifies the source of the request as required by non-GET commands.Warning: All non-GET API requests must include and set a value for the X-Requested-By header. This value is required to prevent cross-site request forgery (CSRF) attacks.
-
-X: This option indicates the request (or command) type, as in this case the POST command. - The URL: Although curl has a URL flag (
--url), it is optional and typically omitted. The URL itself, however, is required, which consists of:The access point for the API,
host:port/api/.The endpoint,
system/indices/ranges/rebuild.
When you run the command, a 202 response code generally indicates that the command completed successfully.
Hint: The Graylog REST API also supports the DELETE method. Although we have not included an example, DELETE methods are typically similar to POST. Be careful when working with DELETE methods. Remember that these commands delete elements or data, and that action usually cannot be undone.
PUT
The PUT command allows you to add or change data within Graylog. Use PUT commands to update information on existing entities, such as changing information or settings or adding additional information. PUT commands tend to be the most complicated, including multiple required or optional parameters.
The following example PUT command updates information on an existing index set:
curl -u UseYourValidToken:token -H "Accept: application/json" -H "Content-Type: application/json" -H "X-Requested-By: XMLHttpRequest" -X PUT http://localhost:9000/api/system/indices/index_sets/66901b1e5449d50c06aab2b4?pretty=true -d '{"title": "BobsImportantSet", "description": "Important indices only Bob can use.", "shards": 1, "replicas": 0, "rotation_strategy_class": "org.graylog2.indexer.rotation.strategies.TimeBasedSizeOptimizingStrategy", "rotation_strategy": {"type": "org.graylog2.indexer.rotation.strategies.TimeBasedSizeOptimizingStrategyConfig", "index_lifetime_min": "P30D", "index_lifetime_max": "P40D"}, "retention_strategy_class": "org.graylog2.indexer.retention.strategies.DeletionRetentionStrategy", "retention_strategy": {"type": "org.graylog2.indexer.retention.strategies.DeletionRetentionStrategyConfig", "max_number_of_indices": 20}, "index_analyzer": "standard", "index_optimization_max_num_segments": 1, "index_optimization_disabled": false, "writable": true, "default": false, "field_type_refresh_interval": 60000}'In the above code, be sure to insert your own generated access token in place of the example shown.
The following information is included in this PUT command:
-
-u: User authentication. See the GET command above for details. -
-H: This option is used to supply headers. This command includes multiple headers:-
The Accept header, which tells the API how the response should be formatted (in this case, as JSON data).
-
The Content-Type header, which tells the API the format of data you are sending with the command, JSON.
Hint: The Content-Type header is often required on POST commands as well. If you are passing data in the request, this header is required.
-
The X-Requested-By header, which specifies the source of the request as required by non-GET commands.
Warning: All non-GET API requests must include and set a value for the X-Requested-By header. This value is required to prevent cross-site request forgery (CSRF) attacks..
-
-
-X: This option indicates the request (or command) type, as in this case the PUT command. - The URL: Although curl has a URL flag (
--url), it is optional and typically omitted. The URL itself, however, is required, which consists of:The access point for the API,
host:port/api/.The endpoint,
system/indices/index_sets/66901b1e5449d50c06aab2b4.Hint: Note that the endpoint includes the index set ID. To find this ID, run the GET
system/indices/index_setscommand either in the API browser or on the command line. The IDs for every index set are listed in the output.The optional
pretty=trueparameter. The command outputs all the properties after the update so you can verify that settings have been changed and potentially do additional processing.
-
-d: This option is used to provide data to the endpoint. Typically, this data is formatted as JSON, which is what the Content-Type header specifies. In the API browser, the Type column in the Model tab in the Response section shows what properties are available to update. Any property you include in this data section replaces any previous value for that same property in your Graylog environment.To discover what data you can update as well as how to format it, your best resource is the method detail pane in the API browser. See the next section for details.
When you run the command, the output displays all the properties with their newly set values.
Build Your JSON Data
Both PUT and POST methods can take JSON data input to create or update various Graylog elements. Check the method detail pane in the API browser for specific methods to see what properties you can set or change.
Use the Model tab in the Response section to see what properties you can update, along with the data type the property expects (integer, string, or Boolean, for example). Use the Example tab to show the JSON format itself to help format the command.
Note that when you have a property with multiple settings (for example, rotation_strategy), additional curly braces are required in the JSON data section. Always be careful to match your opening and closing punctuation (braces, quotes).
When sending JSON data via the API, it can be useful to work from the JSON schema shown in the API browser. In the Request section, the Model tab lists all available fields. A field with an asterisk is required. The Body tab provides the full JSON schema. You can edit this text to run commands in the browser, or copy the text to another editor to update and write your own commands.
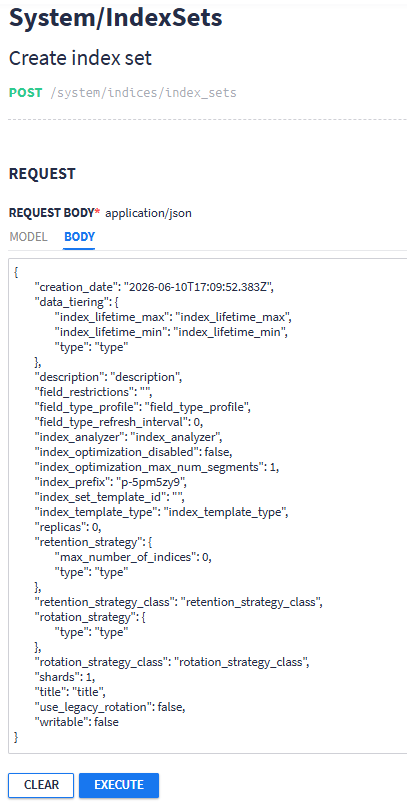
After you add your new information, you can delete from the schema any optional properties that you are not changing. Finally, to use this code from the command line, you need to remove line breaks and extra spaces (or insert the appropriate line break character for your command line tool) before adding your JSON data to your command.
Hint: If you attempt a command without including a required parameter, the error message indicates any missing properties or parameters by name. A parameter might be shown as optional, but could be required based on other options.
Example 2: Build a Command from the API Browser
This example demonstrates how you can work with information from the API browser to build command-line API requests. The use case presented shows how to clone a stream.
Step 1: Get a List of Streams
In the API browser:
-
Locate and select the
GET /streams/paginatedmethod in the left sidebar. You can use the filter field or select Search to use Advanced Search. -
In the detail pane, select Execute. You can add or change parameters first, for instance if you want to change the sort order or add a filter.
When the request runs, output similar to the following is shown:
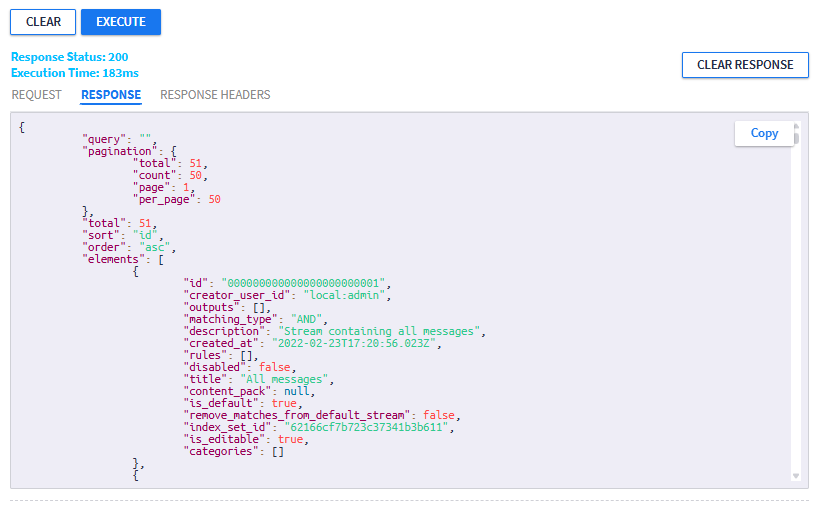
To use this method from the command line, the Request tab shows a curl command to perform the same task, including any parameter values you set. Note that you likely need to customize this code to account for authentication and other details such as remote access.
Step 2: Find Required Parameters
To clone a stream through the API, the stream ID and index set ID of the original stream are required parameters.
In the API browser, you can find this information in the output from the list streams command above. The field id shows the stream ID for a given steam, and the field index_set_id is the ID for the index set for that stream. Copy the IDs of the desired stream to the clipboard.
To parse the curl command result, you can pipe the result into a tool like jq for JSON processing. The following command returns the ID of a stream called Test Stream.
curl ... | jq -r '.streams[] | select(.title == "Test Stream") | .id'
Hint: In a bash script, you would store the IDs in variables to be reused in later steps.
Step 3: Clone the Stream
In the API browser:
-
Open the detail pane for the POST method
/streams/{streamid}/clone. -
Enter the stream ID to be cloned under Path Parameters. This value is the
idfield copied in Step 2 above. -
Select the Body tab under Request Body.
-
Enter the previously copied index set ID into the text editor for the
index_set_idfield. You should also update thedescriptionandtitlefields so the cloned stream appears with unique information. -
Click Execute to clone the stream.
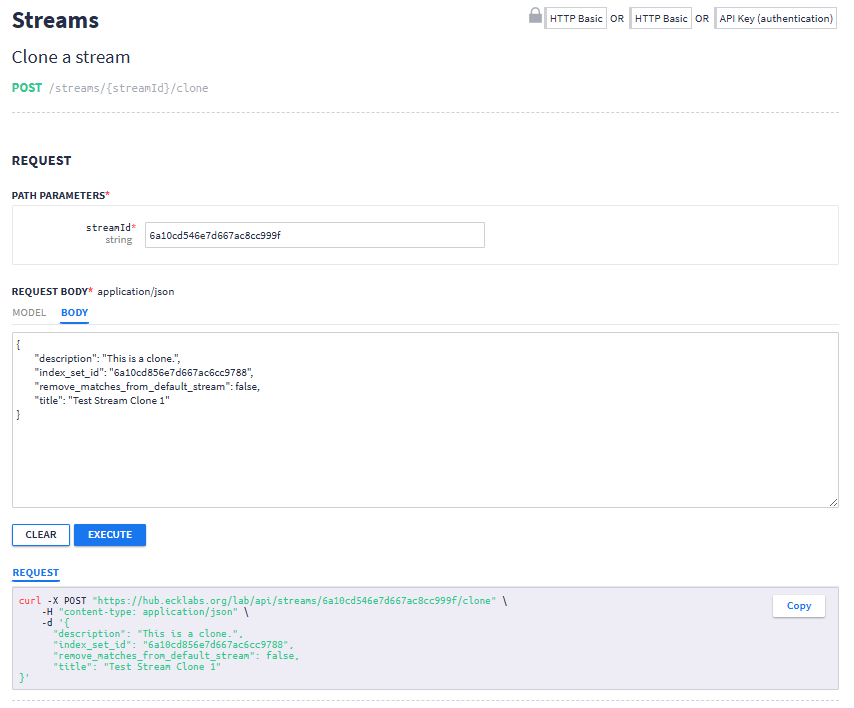
To clone the stream on the command line, construct a curl command with the same values as above:
curl -u UseYourValidToken:token -H 'Accept: application/json' -H 'Content-Type: application/json' -H 'X-Requested-By: cli' -X POST http://localhost:9000/api/streams/66959475448bbf340590f41e/clone -d '{"index_set_id": "669003d209edae4cef01cb64", "title": "Test Stream Clone", "description": "This is a clone."}'In the above code, be sure to insert your own generated access token in place of the example shown.
In this example, the command provides the following information:
-
-u: User authentication, provided by a generated access token. See REST API Access Token for information about creating tokens. -
-H: This option is used to supply headers. This command includes multiple headers:-
The Accept header, which tells the API how the response should be formatted (in this case, as JSON data).
-
The Content-Type header, which tells the API the format of data you are sending with the command, JSON.
-
The X-Requested-By header, which specifies the source of the request as required by non-GET commands.
Warning: All non-GET API requests must include and set a value for the X-Requested-By header. This value is required to prevent cross-site request forgery (CSRF) attacks.
-
-
-d: The data option contains the data to be sent. In this example, the data is a JSON-formatted section that includes the index set ID, title, and description. -
-X: This option indicates the request (or command) type, as in this case the POST command. - The URL: Although curl has a URL flag (
--url), it is optional and typically omitted. The URL itself, however, is required, which consists of:The access point for the API,
host:port.The endpoint,
/api/streams/66959475448bbf340590f41e/clone.Hint: Note that the endpoint includes the stream ID. To find this ID, run the
GET /streams/paginatedcommand, either in the API browser or on the command line. The IDs for every stream are listed in the output.
In a bash script, the stream ID and index set ID would be replaced by the variables resolved in a previous step.
