Now that you have a good foundation for understanding pipeline rule logic, let's look at how to build pipeline rules in Graylog.
In this article, we guide you through creating and managing rules using the both rule builder and the source code editor, including how to simulate rules once they are created. We also recommend you review Rule Building Use Cases to learn the practical application of common rule types.
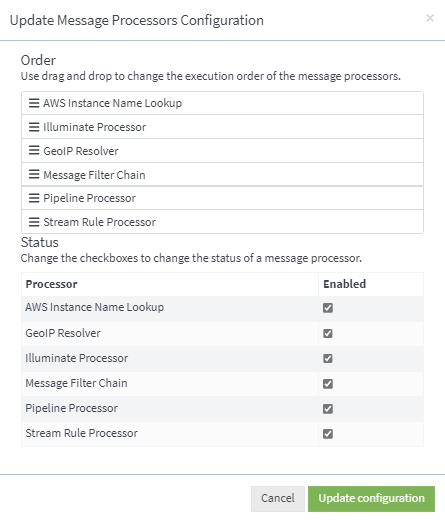
Configure the Message Processor
Before you start building pipeline rules, make sure that the message processor is enabled and correctly configured:
-
Navigate to System > Configurations.
-
Click on Message Processors.
-
Click on Edit configurations and enable the Pipeline Processorby checking the box next to it.
-
Drag the Pipeline Processor so that it comes after Message Filter Chain. Use the six dots to the left to drag.
-
Click Update configuration.

Create and Manage Rules
You can create, edit, and delete your pipeline rules via System > Pipelines under Manage rules. To write a new rule, select Create Rule.
You may choose to use either the rule builder or the source code editor to create your own rules, though the rule builder is recommended and will display by default. To create rules manually in the source code editor, select Use Source Code Editor from the pipeline rule creation menu.
Create a Rule Using the Rule Builder
The rule builder provides a visual method for creating rules directly in the Graylog interface. It is the default tool for building pipeline rules. The rule builder follows a structured "when, then" statement format. "When" statements are built with conditions, and "then" statements are built with actions.
Both statement boxes have searchable drop-down menus. If you enter the first few letters of a function name, the drop-down will provide you with suggestions. The suggested functions will also include a short description of what they do. You may also refer to our functions documentation for a full list of available functions.
To create a rule in the rule builder:
-
Enter a title and description of the rule being created.
-
Create a "when" statement. For example, let's say that you want to decrease the size of your ingested data, so you have decided to remove the
Fortigate patternfield from messages that come through the GELF input. The "when" statement isCheck if message arrived on input Gelf. So, the condition is that the message has arrived via a GELF input. -
Create your "then" statement. Like in the previous example, the "then" statement (or action) would be to remove the field. You can specify this by selecting the
Remove fieldfunction and entering the field name.
You may choose to add one or more statements to your rule. "When" statements may be linked by and or or operators, which are found in the top right corner of the When box. In order to edit or delete a "when" statement, hover over it and select Edit.
"Then" statements can be edited via the drop-down menu, which also provides you with selections such as duplicate and insert above or insert below.
If a "then" statement returns a value, then these values will be displayed as output variables. Note that these variables may be inserted into other statements as needed. All available output variables will be displayed in a drop-down menu.
You can also simulate your new rule in the Rule Simulation module.
Create a Rule with the Source Code Editor
You can also build a pipeline rule by writing "when" and "then" statements using the source code editor. Review Pipeline Rule Logic for more information on the syntax supported in pipeline rules. The source code editor also lists available functions and their details in the rules quick reference to make the task more manageable. The complete syntax of your rule must be included in the Rule source editor.
As with the rule builder, you can simulate your new rule in the Rule Simulation module.
Simulate a Pipeline Rule
Rule simulation is the best way to test your rule before applying it. You can test a rule by providing a normal string to simulate the message field. You may choose to only simulate a field and not the whole message. In this case, enter a key/value pair or JSON in the rule simulation box.
In the rule simulation box, you can also see the values to which the output variables are assigned in each step.
To test a rule in the rule simulator:
- After creating your new rule, select Run Rule Simulation in the Rule Simulation box.
-
Enter a single message string in the box under Rule Simulation.
-
The rule will be applied to the given input and provide a processed message for your reference.
-
You may then either reset the simulator to run another message string or update the rule if you have chosen to make modifications.
Manage and Create Pipelines
Once you have created multiple rules in Graylog, you can create processing pipelines that execute these rules to modify and enrich your messages.
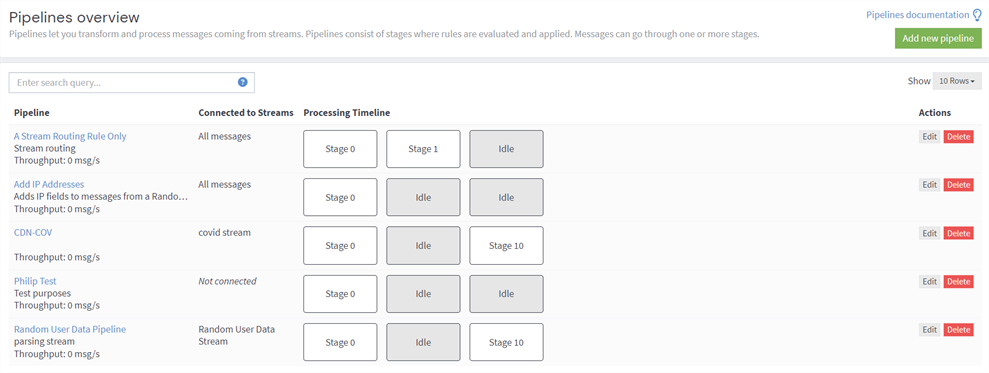
To manage and create new pipelines, navigate to System > Pipelines and select the Manage Pipelines tab. Here you may create, edit, and delete pipelines by clicking the Edit or Delete buttons found at the end of each row.

In order to create or edit pipelines, you need to add your rules to a stage, which have a certain priority. You can add rules to the default stage (priority 0) or create new stages with potentially different priorities.
Edit Pipeline Stages
Recall that pipeline stages are components within a processing pipeline that define the sequence and logic for processing log messages. Stages are executed sequentially in numerical order, and a pipeline can have more than one stage. When you create or edit a stage, you must determine how to proceed to the next stage in the pipeline.
All the stages associated with a pipeline will be displayed in the Processing Timeline column.
To define a new stage to be applied on an existing pipeline:
-
Select Edit next to the pipeline in the Pipelines Overview menu.
-
Click Add new stage.
-
In the stage modification menu, first determine the stage priority, which determines at what point in the sequence the pipeline will be applied.
-
Then, determine the condition under which the message processor will proceed to the next stage by selecting one of the following:
-
All rules in this stage match the message
This option will only consider further stages in the pipeline when all conditions in rules evaluated in this stage are true. This is equivalent to
match all. -
At least one of the rules in this stage matches the message
Selecting this option will continue to further stages in the pipeline when one or more of the conditions in rules evaluated in this stage are true. This is equivalent to
match either. -
None or more rules on this stage match
This condition indicates that the processor will continue to further stages in the pipeline when none of the rules evaluated in this stage are true. This is equivalent to
match none.
-
-
Under Stage rules, select the rules in this pipeline that you wish to be applied at this stage of processing.
-
Select Add stage to complete.
Now your new stage is prioritized and applied to your pipeline.
Connect Pipelines to Streams
For pipelines to apply to log messages, you must decide which streams to attach to your pipeline. Pipeline rules only apply to messages in your selected streams, so ensure that you include all desired streams in the connection configuration.
To add or modify the streams connected to your pipeline:
-
From the Pipelines Overview page, select Edit next to your desired pipeline.
-
Select the Edit connections button under Pipeline connections.
-
Use the drop-down menu to select the streams to which this pipeline will apply, or select Remove next to the stream to which the pipeline should no longer be connected.
-
Click Update connections to apply these settings.
You can assign multiple pipelines to the same stream, in which case all connected pipelines will process messages routed into that stream based upon the overall order of stage priorities.
Simulate Your Pipeline
After applying changes to the message processing on a pipeline, you may want to preview how your pipelines are applied to your selected streams. This can be done via the pipeline simulator.
-
Navigate to System > Pipelines.
-
Select Simulator from the top menu. Here you can test how a log message will be processed under its current pipeline settings.
-
Select the stream that will be used for testing purposes. Note the All messages stream is used by default.
-
Now you will need to provide a raw message that will be routed into the stream you want to simulate. The raw message should use the same log format that it will use upon ingestion into Graylog. For example, you can add a GELF message in the same format your GELF library would send in this field.
-
You may optionally provide the source IP of the message and the input type via which the message will be received.
-
Finally, select the correct codec for the message you provide. A codec here refers to the mechanism Graylog will used to parse, encode, or decode log messages as they are ingested.
-
Select Load message to start the simulation.
Once completed, the simulation provides the following results for your consideration:
-
Changes summary
Provides a summary of modified fields in the original message, as well as a list of added and dropped messages.
-
Results preview
Shows all fields in the processed message.
-
Simulation trace
Displays a trace of the processing, indicating which rules were evaluated and which were executed. It also includes a timeline, in microseconds, to allow you to see which rules and pipelines require the most time to process.

