Reports are created by combining multiple dashboard widgets that contain information from your Graylog system into documents that are targeted and organized for specific purposes.
Create a Report
You create and manage reports on the Enterprise > Reports page. The Reports page displays a table view of all existing reports. You can sort by columns or apply a filter to find reports you need.
To create a new report:
-
Click Create report. The Create Report page contains two sections: On the left, there are tabs for configuration options, and on the right, you can view the report summary visualization.
-
Select your desired report format. The report summary displays the report details and data as you make selections. You can select the format for the final report at the top of this section: PDF, CSV, XLSX, YML, JSON, and XML.
The report visualization is available only if PDF is selected. If you plan to do additional processing with the data, one of the other formats might be more appropriate.
-
Select report options on each of the five tabs: Overview, Content, Delivery, Style, and Share (each described in detail in the following sections).
Hint: As you move from one tab to the next, we strongly recommend you save your choices. Click the Create button to save. After your first save, Create changes to Update on the buttons. -
Click Update and close to save your final choices and return to the main list of reports.
Manage Reports
When you create a report, it is added to the list on the main Reports page. The columns provide at-a-glance information about each report. Use the More menu in the Actions column for the following options:
-
Edit: Change or add details to the configured report.
-
Report archive: View the history of generated and sent reports. See View Report Archive for more details.
-
Download report now: Generates and downloads the report on the local machine.
-
Send report now: Generates and sends the report to configured recipients. If no recipients are configured, this option is not enabled.
-
Manage collections: Allows you to add the report to existing collections, or remove the report from previously added collections.
-
Delete: Removes the report from the list.
Add Overview Attributes
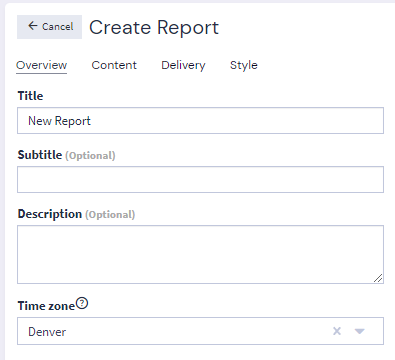
Use the Overview tab on the Create Report screen to enter general descriptive information about what this report contains. This information appears as the cover page on the generated report.
Enter the following information:

-
Title: Give each report a unique, descriptive title.
-
Subtitle (optional): Enter a report subtitle, if desired.
-
Description (optional): Provide a detailed summary about what readers can expect to find in this report. Although this field is optional, as a best practice consider including this information for your recipients.
Hint: The description appears at the top of the first page of data in the report rather than on the cover page. -
Time zone: Select the time zone that is used to display data in the widgets throughout the report. The default value is UTC.
Configure Report Content
The Content tab on the Create Report screen is where you configure the dashboard widgets you want to include in the report. To add widgets:
-
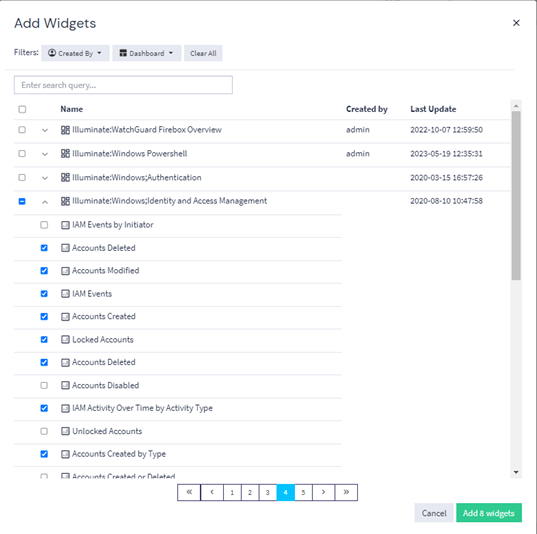
Click Add widgets. The Add Widgets window lists all of your saved dashboards. Expand a dashboard to view individual widgets.
-
Select the widgets you want to include.
Select the check box beside a dashboard to add all of its widgets to the report. From the dashboard expanded view, select the widget check box to add an individual widget.
 Hint: You can use the filters and search box at the top of the form to find specific dashboards or widgets. These options can be particularly useful in large environments when you have multiple pages of dashboards to choose from.
 -
Click Add [#] widgets when you've made your selections. Note this button shows the total number of widgets that will be added to your report.
After you add widgets, they are listed in the Widgets area of the Content tab.
-
(optional) To adjust your report content, take the following actions:
-
Reorder content: To change the order of widgets, drag an item up or down by the dots symbol on the left
-
Add custom detail: Click Edit for a widget to add a Custom Title or Custom Description. By default, the report uses the title and description from the original widget. Use these custom fields, if necessary, to focus your report for a specific audience.
-
Delete: Click Delete to remove a widget from the report.
-
As you make any changes, the report summary adjusts in real time if the report is in PDF.
Schedule a Report
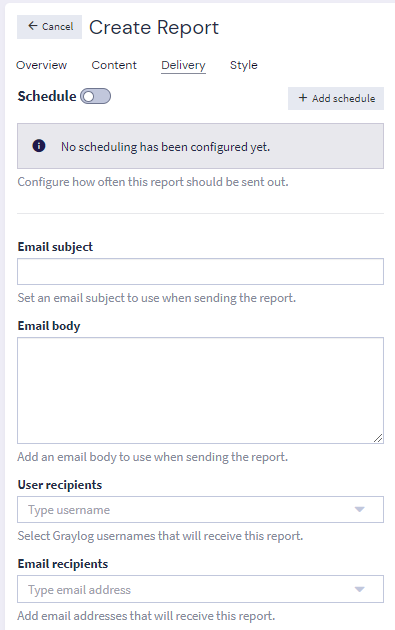
The Delivery tab of the Create Report screen is where you configure a schedule and select recipients for automated creation and delivery of the report.
Scheduling reports uses background resources on the Graylog cluster and your search backend clusters. To avoid performance issues, make sure to allocate enough resources for your setup. Also, you can disable the scheduling feature for reports that do not require automated delivery.
Complete the following information for report scheduling:

-
Schedule: Toggle this option on only if you want this report to run on a schedule. Even if you have a configured schedule, leaving this option off means the report will not run on a schedule.
-
Add schedule: Click Add schedule to set a delivery frequency. For Frequency, you can choose between Hourly, Daily, Weekly, and Monthly. Then, fill in the additional frequency options and click Add frequency.
Hint: You can add multiple schedules to a report. For example, if you want to generate a report daily at 8:00 a.m. and again at 4:00 p.m., you would need two schedules. For both schedules, you would select Daily as the Frequency. Under Daily frequency options for the first, select 08:00 and the appropriate time zone. For the second, select 16:00 and the same time zone. -
Override widget time ranges with selected frequency: Select this check box to override the time range defined in all widgets with the selected delivery frequency. By default, widgets use the time range originally defined on the dashboard. For example, a widget might pull data from the past five minutes. If you select this option, and your delivery is set to "daily at 5:00 a.m.," all widgets in your report use data from the previous 24 hours because the delivery frequency is daily.
-
Email subject and Email body: Enter the email subject line and body text for the email message. Scheduled reports are sent as email attachments, so providing good descriptive information in these fields can help users find the information quickly and keep the message from being identified as spam.
-
User recipients: If intended recipients are users of this Graylog system, you can select them by their username from the drop-down menu.
-
Email recipients: Add email addresses for intended recipients. If you added a recipient by using a Graylog account above, you don't need to duplicate them here.
Hint: You can create a report that has no recipients. In that case, you must manually download the report from More > Download report now. If you schedule a report with no recipients, you can find any successfully generated reports from the schedule at More > Report archive. See View Report Archive for more detail.
Add Style Options
The Style tab of the Create Report screen includes additional options to help you format your report.
Choose from the following options:
-
Size: Choose between A4 and US Letter for the report page size.
-
Orientation: Determine whether you want the report generated in Portrait or Landscape mode.
-
Header: Add a page header to the top of each page of the report. When you enable this option, you can enter header text as well as upload a logo image. Note the following image upload restrictions for the logo:
-
File format must be JPEG or PNG.
-
File size cannot exceed 1 MB.
-
-
Footer: Add a page footer to the bottom of each page of the report. When you enable this option, you can enter footer text and enable page numbers.
-
Table of Contents: Enable this option to include an automatically generated table of contents that lists each widget in the report. The table of contents appears as the second page in the report, and each entry is linked to the specific widget within the report.
-
Hide widget description: Enable this option to omit the widget description from the widgets in the report. This option is a global selection for the report, so it removes descriptions from every widget you have included.
Hint: Note that this setting also overrides any custom description you might have added on the Content tab. -
Hide query in widget description: Enable this option to remove the query from description text in widgets in the report. This option is a global selection for the report, so it removes the query from descriptions in every widget you have included. If Hide widget description is enabled, this option is not available.
Add Collaboration and Sharing
The Graylog permissions model requires you to grant access to any intended collaborators on an entity. You can share entities with individuals or teams when you create the entity.
Add Collaborator
Use the Add Collaborator section to share the entity with individual users or teams. You can set a different access level for each collaborator you add.
-
Enter a search term or scroll the list to find a user or team to add.
-
Select the access level the user should receive:
-
Viewer: Can view the entity but not make any changes to it. -
Manager: Can edit any aspect of the entity. For some entities, this access level allows the user to delete the entity. -
Owner: Has the same permissions asManagerbut adds the ability to share the entity with other users.
-
-
Click Add Collaborator.
Repeat these steps for each collaborator you want to add. As you add collaborators, they are listed with their access level. You can change the access level or delete a collaborator before proceeding.
Add to Collection
Use the Add to collection section to add the entity to a collection. Enter a search term or scroll the list to find a collection, then select the item to add it. Note that you can add multiple collections in this field. The entity is added to each collection you include. All entities in a collection are shared together when you share the collection.
See Collections for information about using collections for sharing and permission management. See Permission Management for complete information about roles and sharing in Graylog.
View Report Archive
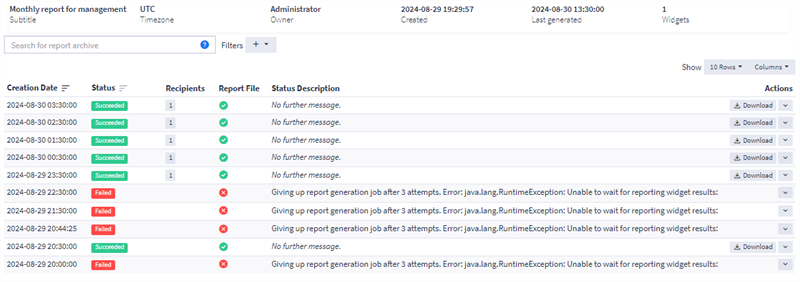
You can view the history of generated reports in the report archive. The list includes all scheduled reports as well as all reports that have been generated and sent via the Send report now option. The list does not include reports generated on demand for download.
To view the report archive, click the report title in the list. You can also select More > Report archive for the report you want to investigate.

The archive view provides useful information, particularly for reports that fail to generate. Check the Status Description column for information about errors during report generation or delivery.
If a report is generated but delivery failed, you can download the report here by clicking Download in the Actions column. You can also download any of the past successful reports.
By default, the reports history is limited to a total of 10 GiB of stored reports. If this value is exceeded, the oldest entries are deleted. You can adjust the report history max size at System > Configurations. Select Plugins > Reporting, then click Edit to update the value.
Reports Manager role to update the Maximum Report History Size setting.
Generating Reports On Demand
In addition to scheduled reports, you have the following two options for generating reports on demand. You can generate a report on demand even if it also runs reports on a schedule.
Generate and Download a Report Manually
To manually generate and download a report from the Reports page:
-
Click More for the report you want to download.
-
Select Download report now.
Note that report generation can take a while. The Status column updates to show progress of the current job.
Send a Report via Email
To manually generate and send a report from the Reports page:
-
Click More for the report you want to send.
-
Select Send report now.
Hint: If the report has no recipients configured, this option is not enabled. You must select at least one recipient before you can send the report with this method.
Note that report generation can take a while. The Status column on the main Reports page (Enterprise > Reports) updates to show progress of the current job.

