Defender Scanners in Graylog
Microsoft Defender Vulnerability Management is part of the Microsoft security platform you can integrate with Graylog to provide up-to-date asset vulnerability information. Defender Vulnerability Management performs device assessments, including configuration review to uncover vulnerabilities, which can be tailored to your business context.
You can connect Graylog to your existing Defender Vulnerability Management service. Graylog imports scan data from Defender and attaches any vulnerabilities to your related machine assets.
You need your Microsoft client application information for your Defender instance to create a connection in Graylog, specifically your tenant ID, client ID, and the client secret to authorize the connection. See the Microsoft Defender Vulnerability Management documentation for more information.
Add a Defender Scanner
To add a Defender scanner:
-
Go to Security > Assets and select the Vulnerability Scanners tab.
-
Click Add Scanner, then choose Defender from the menu.
-
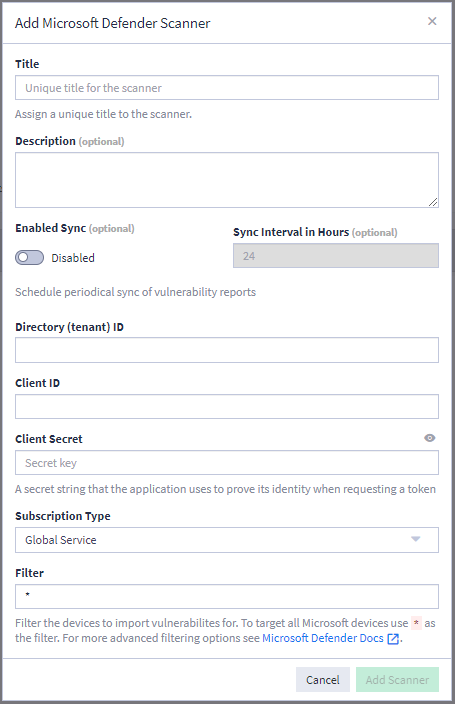
Fill in the connection details and other information for the scanner:
-
Title: Give the scanner a unique, meaningful name.
-
Description (optional): Provide detail about the purpose of this scanner. Although this field is optional, consider adding information here, particularly if you create multiple Defender scanners.
-
Enabled/Disabled Sync (optional): Toggle this setting to Enabled to automatically import scan data on a specified interval.
-
Sync Interval in Hours (optional): If you enable sync, this setting becomes available so you can determine how frequently to run a new import of scan data to update vulnerability information on your Graylog assets. The default setting is 24 hours (once per day).
Hint: The next three fields require information that you need to provide from your Microsoft Defender App registration environment. See the Microsoft Defender Vulnerability Management documentation for complete information.-
Directory (tenant) ID: Enter this value from your Microsoft App registration.
-
Client ID: Enter this value from your Microsoft App registration.
-
Client Secret: Enter the client secret, which is used to prove identity when requesting a token.
-
Subscription Type: Select your subscription type from the drop-down menu: Global Service (this is the standard plan for most users), US Government, or US DOD.
-
Filter: By default, the scan import pulls all data from this scanner. Enter a filter to limit what data this scanner imports. Note that Defender filters must be entered as OData queries. View the Microsoft documentation for information on creating filters.
After you provide the connection information, Graylog tests the connection. The result of the test displays at the bottom of the dialog.
-
-
Click Add Scanner to add the scanner.
New scanners are added to the list on the Vulnerability Scanners tab of the Assets page.
Import Vulnerability Scans
You have two methods for importing new vulnerability scan data: automatic sync and manual import. With either method, new imports completely replace previous information so all existing vulnerabilities are updated, as appropriate, and any new information is added.
Import Sync
You enable the automatic sync option with the Enabled Sync setting when you define the scanner. You can also use the toggle on the table view under Enable Periodical Imports.
When the sync option is enabled, new vulnerability data is imported according to the sync interval you set.
Manual Import
To manually import scan data:
-
Click a scanner to view its detail page.
-
Click Import Vulnerabilities.
-
Click Import on the dialog box to confirm.
Further Reading
Explore the following additional resources and recommended readings to expand your knowledge on related topics:
