This is a Graylog Enterprise feature and is only available since Graylog v3.3+. A valid Graylog Enterprise license is required.
Microsoft Office 365 is a widely used cloud-based suite of productivity tools that allows you to pull your organization’s Office 365 logs into Graylog for processing, monitoring, and alarming.
Required Office 365 Setup
Prerequisites
To use the Office 365 plugin, create and authorize a Client Application through your organization’s Microsoft Azure portal.
A working Office 365 subscription with access to audit logs and to the Microsoft Azure portal for your organization is required. (E5/A5 accounts typically have the required access, but this will need to be verified.)
Your Graylog installation will then poll your Office 365 audit log and ingest new logs into Graylog on a specified interval.
The following steps for configuration are mandatory.
Azure Configuration
-
Login to Microsoft Azure.
-
Select Azure Active Directory from the left-hand menu.
-
Select App Registrations under the Manage heading from the left-hand menu.
-
Select New Registration from the top of the right-hand pane.
-
Register a new application with the following actions:
- Provide a name for the application (e.g. “Graylog Log Access”).
- Select the appropriate account type. This should be either
Single TenantorMultitenantdepending on whether your organization has a single or multiple Active Directory instance(s). - Do not add a
Redirect URI. - Click the
Registerbutton.
-
Once the application is created, the following fields are needed to set up the O365 plugin:
Application (client) IDDirectory (tenant) ID
-
For the newly created application, navigate to Certificates & Secrets.
-
Click on New Client Secret.
-
Add a description for the new secret, select an expiration time, and then click Add.
-
Make a note of the generated value; you will need it to set up the O365 Plugin.
Client Application Permissions in O365
- For the newly created application, navigate to API Permissions
. - Click on Add a permission
. - Select Office 365 Management APIs
. - Select Application Permissions
. - Select all available permissions on the list and click Add permissions
. - Click on Grant admin consent for...
- Click Yes in the pop-up dialog to confirm.
Enable Unified Audit Logging
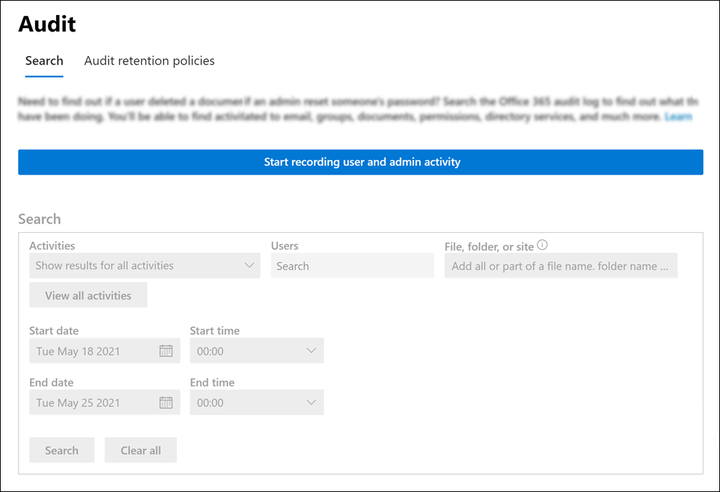
Navigate to the Audit Log Search page in Microsoft Purview and click the Start recording user and admin activity button to enable audit logging.

Up to 24 hours may be needed for logs to enter Graylog the first time Unified Audit Log is enabled. We strongly recommend waiting 24 hours before proceeding with O365 Input setup in Graylog to ensure your Subscription in Azure is properly set up for audit logging.
If there is no blue button stating Start recording user and admin activity, then audit logging is already enabled, and you can proceed with the remainder of input configuration.
Plugin Configuration
Client ID, Tenant ID, and Client Secret Value from the previous sections to proceed.-
Input Name
- Provide a unique name for your new O365 Input.
-
Directory (tenant) ID
- The ID of the Active Directory instance for which Graylog will collect log data.
-
Application (client) ID
- The ID of the Client Application created above.
-
Client Secret Value
- This is the client secret value generated above.
-
Subscription Type
- Indicates what type of Office 365 subscription you have.
Enterprise and GCC government plansis the most common selection.
O365 Content Subscription
-
Log Types To Collect
- Determines which of the five available log types the input will pull from Office 365. All log type options are selected by default: Azure Active Directory, SharePoint, Exchange, General, and DLP.
-
Polling Interval
- Determines how often (in minutes) the input will check for new log data.
- Defaults to 5 minutes. We recommend leaving this at the default. Value should not be less than 1 (minute).
-
Drop DLP logs containing sensitive data
- O365 produces a summary log with no sensitive data and a detailed log with sensitive data for each DLP event. When set, this option causes detailed logs to drop and prevent sensitive data from being stored in Graylog.
-
Enable Throttling
- Enables Graylog to stop reading new data for this input whenever the system falls behind on message processing and needs to catch up.
-
Store Full Message
- Permits Graylog to store the raw log data in the
full_messagefield for each log message. - Selection can result in a significant increase in the amount of data stored.
- Permits Graylog to store the raw log data in the
